The Ultimate Guide to Setting Up and Optimizing The Sims Medieval [TSM]

Have you always wanted to make your The Sims Medieval run smoothly?
I know, the game keeps crashing... so you start looking for optimization guides, but they’re confusing; then you try following the tutorials, yet nothing works, you waste hours, get frustrated, and eventually give up... That’s usually the exhausting journey of trying to play TSM nowadays.
❕ I apologize in advance for my poor English, as it is not my native language.
STEP 1: REMOVE LEFTOVER FILES FROM PREVIOUS INSTALLATIONS
Before anything else, regardless of whether your copy is official or “Captain Jack Sparrow”, have you ever installed TSM on your PC before? If the answer is yes, then there are probably leftover files still buried in your system, and they can cause conflicts or inexplicable errors when trying to reinstall the game. For a truly clean installation, the first thing you need to do is permanently remove those leftovers.
- In the Documents folder: completely delete the following directory:
\Electronic Arts\The Sims Medieval - In the Program Files folder: delete the game’s root folder, for example:
C:\Program Files (x86)\Electronic Arts\The Sims Medieval - In the ProgramData folder: leftover files can sometimes remain here as well, so they need to be removed; enable the option to show hidden items and check the following directory:
C:\ProgramData\Electronic Arts
STEP 2: DRIVER CHECK
It’s important to make sure that your graphics card drivers and system drivers are up to date. Just to be safe, also verify that the following components are installed on your system:
STEP 3: DOWNLOAD AND INSTALL THE SIMS MEDIEVAL
You can purchase the game through official stores.
However... it’s no secret that “alternative” versions exist.
That said, I do NOT recommend downloading the Internet Archive (archive.org) version, because that release is corrupted and unsafe. Even less so the Sims Tarac version, since the site was hacked (or possibly taken down altogether).
After installing the game, add the main game folder, located in your drive’s root directory, to your Antivirus / Windows Defender exclusions list.
STEP 4: INSTALLING MODS
This part is simple and straightforward. To do that, follow the tutorial: How to Install Mods in The Sims Medieval.
STEP 5: APPLYING THE 4GB PATCH + SMOOTH PATCH + ALDER LAKE PATCH
The first patch modifies the executable file (TSM.exe), while the second optimizes the game’s code, reducing stuttering and lag to make gameplay much smoother.
Allows the game to use more RAM.
Download and run it. Then select the executable file (TSM.exe) and click Open.
That’s it! A success message should appear right afterward.
❗ TSM.exe is located in the game’s root installation directory, usually: C:\Program Files (x86)\Electronic Arts\The Sims Medieval\Game\Bin
Or, if you supposedly have an alternative "Captain Jack Sparrow" version: C:\Program Files (x86)\Mr DJ\The Sims Medieval\Game\Bin
For the Smooth Patch settings, I always set the FPS limit to 60 (though 30 FPS also works well).
Download the patch, extract it, and move the following files: wininet.dll, TS3Patch.txt, TS3Patch.asi to this directory: [Game Installation Directory]\The Sims Medieval\Game\Bin
Then open the TS3Patch.txt file and configure it like this:
FPSLimit = 60 (or 30, if you prefer)
Save the changes and close the file.
For Windows 11 users, 12th-gen Intel CPUs, and anyone saying: “the game keeps freezing constantly and I have no idea why.”
- Download and extract the patch;
- Run AlderLakePatch.exe;
- Specify the path to the game executable (TSM.exe). It’s located in the root installation directory, as shown in the previous steps;
Done! A success message should appear afterward.
STEP 6: INCREASING TEXTURE MEMORY + CPU BOOST
Textures use video memory (VRAM), and if there isn’t enough VRAM available, the game may suffer from performance issues or graphical corruption.
1- Go to the game’s root directory, open the \Game\Bin folder, copy the GraphicsRules.sgr file to your Desktop, and open it with Notepad;
2- Near the beginning of the file, find the following lines:
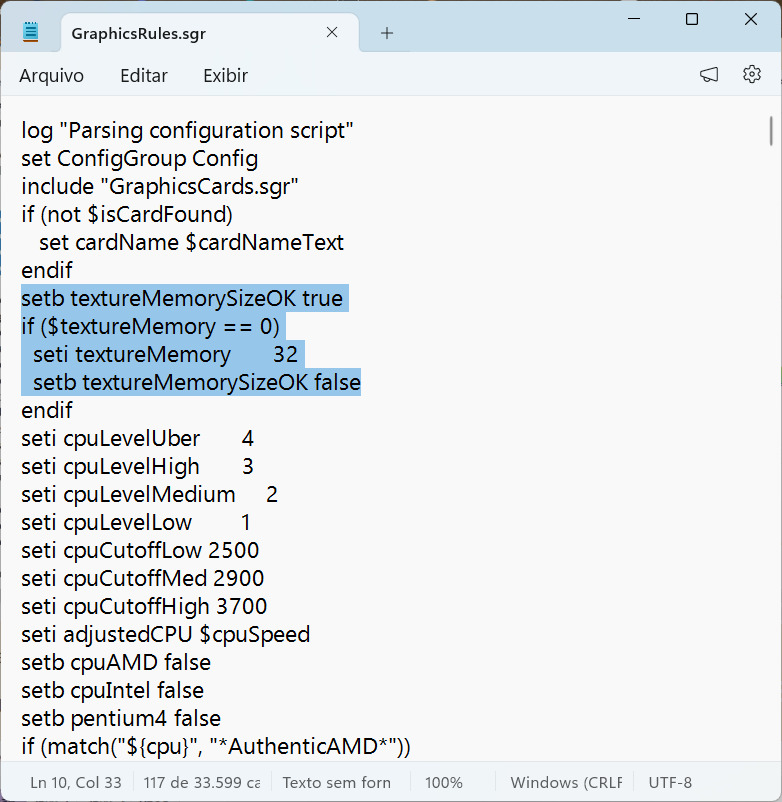
3- The line seti textureMemory 32 controls the texture memory allocation.
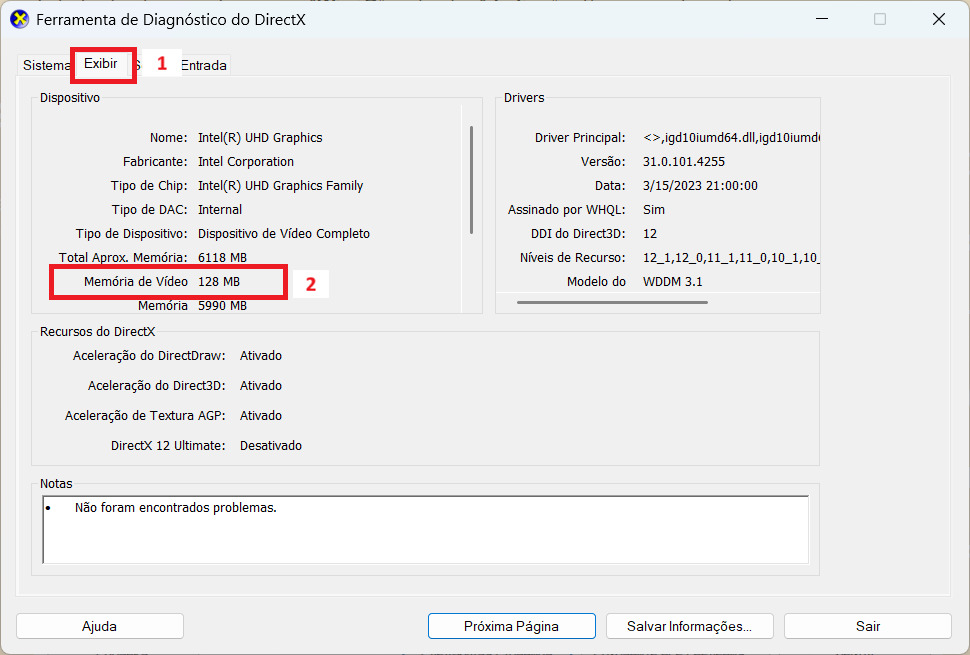
To find out your GPU’s VRAM amount, press Win + R, type dxdiag in the window that appears, and click OK.
In the DirectX Diagnostic Tool window, open the Display tab and check your Display Memory (VRAM) value.
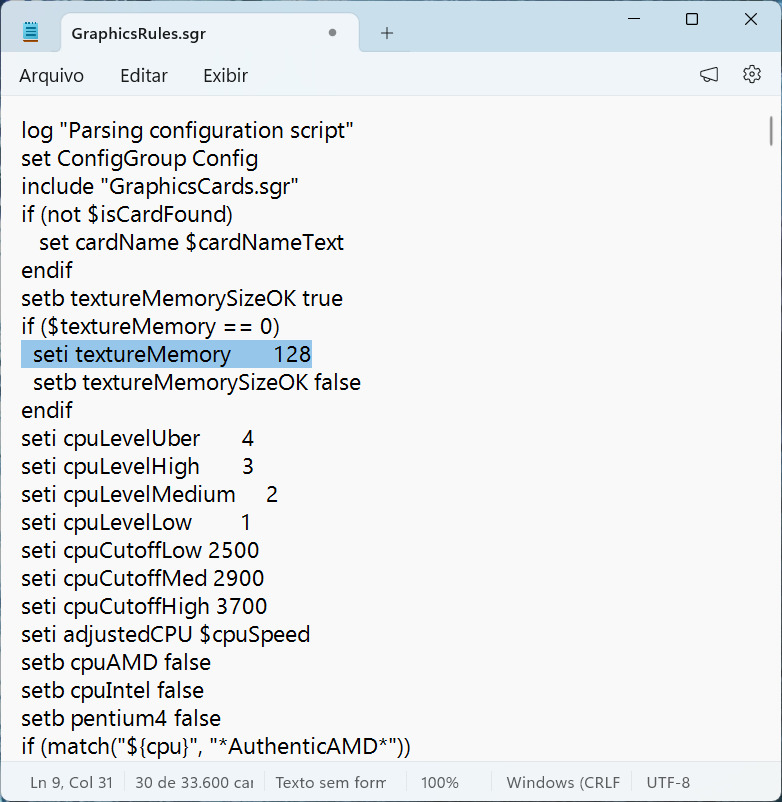
4- Then go back to the open GraphicsRules.sgr file and replace the value 32 with your VRAM amount. For example, mine is set to 128...
❗ Set whatever value you want, but do not go above 4096.
5- After that, still near the beginning of the file, find the following lines and change all their values to 3:
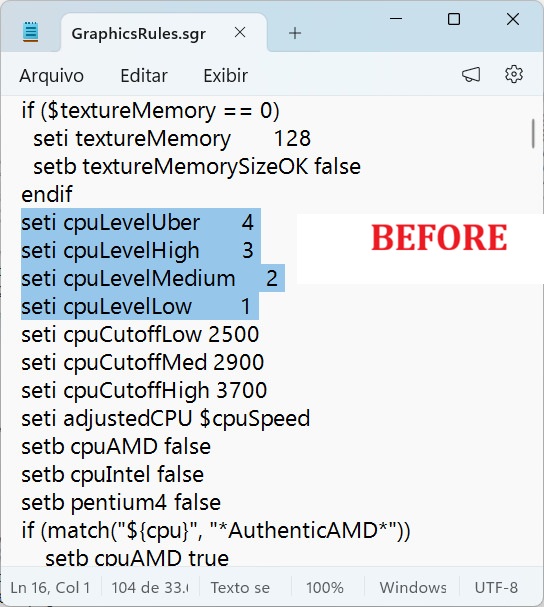
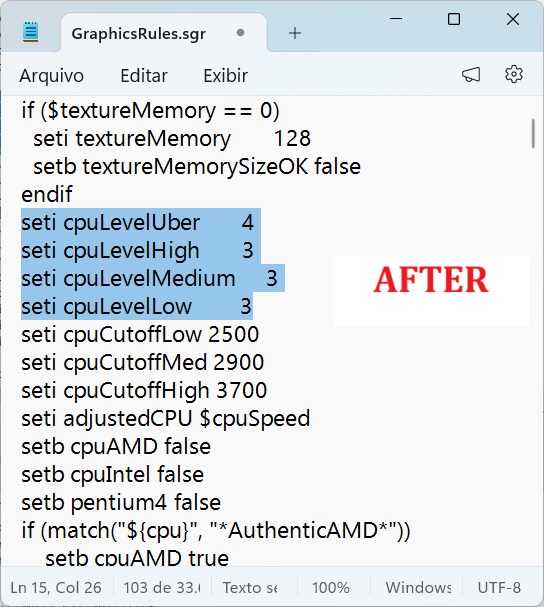
6- Save the changes and close the file.
Make sure the file was saved with the .sgr extension, since Windows sometimes saves it as a .txt file instead. If that happens, simply rename the extension back to .sgr;
7- Move the edited GraphicsRules.sgr file back into the Bin folder and replace the original file.
STEP 7: COMPATIBILITY MODE + ADMINISTRATOR SETTINGS
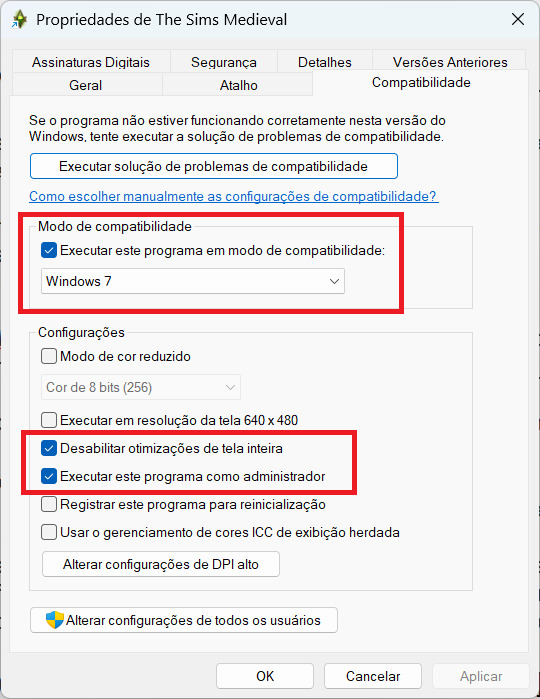
One important setting for making the game run smoothly is enabling Windows 7 compatibility mode, disabling fullscreen optimizations, and granting administrator privileges.
To do this, right-click the executable file (TSM.exe) and select Properties.
Open the Compatibility tab and enable the following three options:
- Run this program in compatibility mode for: Windows 7
- Disable fullscreen optimizations
- Run this program as an administrator
Click OK to save the changes and close the window.
STEP 8: CONFIGURING THE GAME’S GRAPHICS SETTINGS
And now comes the moment to launch your game for the very first time after all these adjustments.
It’s extremely important that you always start the game directly through the executable file (TSM.exe) and NOT through the EA Launcher.
- Once the Main Menu appears, open the game settings by clicking the three dots icon in the lower-left corner of the screen, then stay on the first tab (Graphics);
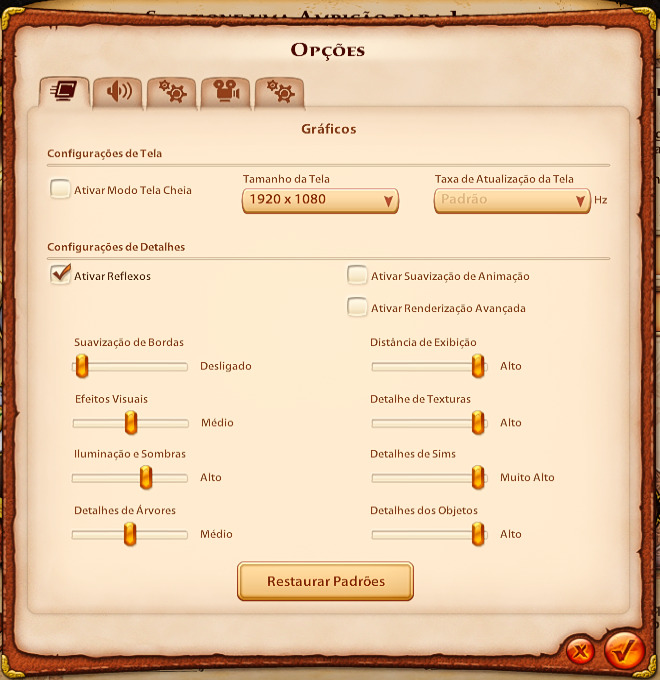
- Here, the important thing is to disable Fullscreen Mode and set the Screen Size according to your monitor’s native resolution. Mine, for example, is 1920x1080.
To find yours, go to your Windows settings:
Settings > System > DisplayYou’ll find your screen resolution under:Scale & layout > Display resolution.
- I recommend disabling Animation Smoothing and Advanced Rendering, unless you have a particularly powerful PC.
It’s also highly recommended to keep Edge Smoothing turned Off. As for the other settings (Effects, Lighting & Shadows, Distance, and Detail) you can adjust them however you prefer;
- Click the ✅ icon to save the changes, then restart the game.
STEP 9: IMPORTANT EXTRA TIPS
1- You can always create separate folders for specific mods inside your \Mods\Packages directory, but it’s important that both the folder names - and the mod filenames themselves - use English or another Latin-based language format: no special characters, no spaces, no accent marks, and no ç.
If any downloaded mod uses those characters, simply rename it.
You can safely use underscores (_), hyphens (-), and exclamation marks (!).
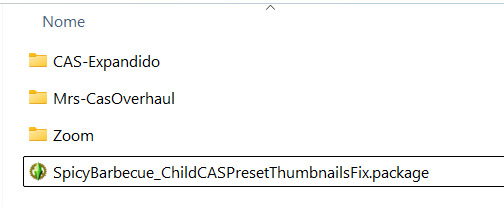
2- It’s extremely important that the Electronic Arts folder inside your Documents directory is NOT added to any cloud backup service (Google Drive, OneDrive, MEGA, Dropbox, etc.), since the files may end up being constantly deleted or overwritten automatically.
3- Avoid saving your game while in Sim Mode; it’s safer to save while in Kingdom Mode instead — unless you use Grim’s **Auto Save 2.0** mod, in which case you should be fine.
Also, never use the Save and Quit option, since it’s notorious for causing errors and corrupting save files. The community also generally recommends using "Save As..." whenever possible;
4- NEVER use the old Populous mod by Simmodder99, the one that increases the number of servants. It corrupts NPC rest locations and can damage your save files;
5- Having too many saved or downloaded Sims inside the SavedSims folder can prevent the game - especially CAS - from loading properly, resulting in an infinite loading screen;
6- If you use Windhawk, be aware that it can cause the game to freeze or crash at completely random moments;
7- The infamous Blue Eyes Bug was fixed by Mrs4ewup’s Mrs CAS Overhaul mod.
This bug happens when the game, for unknown reasons, completely wipes the default data of certain appearance items. As a result, they end up using incorrect colors that can no longer be changed. The issue itself - and everything connected to it - is buried deep within the game’s code and affects multiple systems. With this mod, you can choose whether to apply the fix only to the selected Sim or to every Sim in the kingdom.
8- Get into the habit of clearing the cache regularly.
Simply delete the following files from: Documents\Electronic Arts\The Sims Medieval
- CASPartCache.package
- compositorCache.package
- simCompositorCache.package
- And the Thumbnails folder.
I hope this guide helped you enjoy the legendary The Sims Medieval experience once again. If it did, consider interacting with the post and sharing it with others.
If you still run into issues after all of this, or if you’re looking for custom content and more mods, you can always check out the blogs of the most active and well-known creators in the Medieval community - which I’ll leave below - since there’s always something new appearing.
May the Watcher bless you!
Special Thanks & Credits:
- 💝 mariacherry
- 💝 leebbi04
Other Creators:
- 🫶 spicybarbecue
- 🫶 lillithsparda
- 🫶 Mrs4ewup
- 🫶 Vyrelis
Other TSM Communities:
Where to Find Mods & CC:
- 🔎 Nexus Mods
- 🔎 Mod The Sims
- 🔎 Simblr-cc
Other Blogs:
- 🔮 Sauris Sims (Downloads for TSM)
- 🔮 Carl's Sims Medieval Guide (strategy guide for players)
TSM Challenges: