Basic editing of CAS cc in s3pe for beginners
by truebass
Uploaded Dec. 11, 2025, 7:51 p.m.
Updated May 28, 2026, 2:58 p.m.
I decided to write this tutorial, because knowing how to edit some of our cc can be really useful sometimes. I don't think I've ever seen anyone explaining these things other than an occasional forum post of someone asking for help.
To start off, I'd like to say that this tutorial is targeted towards the average player, especially people who are new to the Sims 3. I'll go on to describe what can (and should) be changed in the package files we typically download to use in Create-a-Sim, as well as how to do that. Please note that my experience in these things is relatively limited, so I'll try to keep this short and only talk about things I know for sure.
In order to start editing, we'll need is a program called s3pe (short for Sims 3 Package Editor). It is the Sims 3 equivalent of simPE, the package editor for the Sims 2, and is available to download on simological.com, a website that used to host a forum dedicated to the sims 1, 2 and 3. The program is extremely useful and can do many, many things, some of which I'll try to teach you in this tutorial.
It comes in two versions: Windows Easy Installer and an Unpack-It-Yourself. Both work identically, the only difference between them being that the latter doesn't need to be installed in order to use — you may just unzip it and run s3pe.exe. I'm not sure which one you should choose, I have used both in the past and they have served me well. I believe however that installing it is the only way to make s3pe the default program for .package files.
After you've downloaded the program, you'll need to open one of your package files with it. The easiest way it to click and drag it to the left side of the program; you may also click on file>open or hit ctrl+O on your keyboard. Click import. S3pe will then ask you whether you'd like to autosave after each package is imported; if you choose yes, s3pe will overwrite the original file automatically when you save for the first time instead of asking you. After that, you'll see a long list of numbers and text. I know it can be intimidating at first but it's not that complicated if you know what to look for.
Editing Clothing and Hair
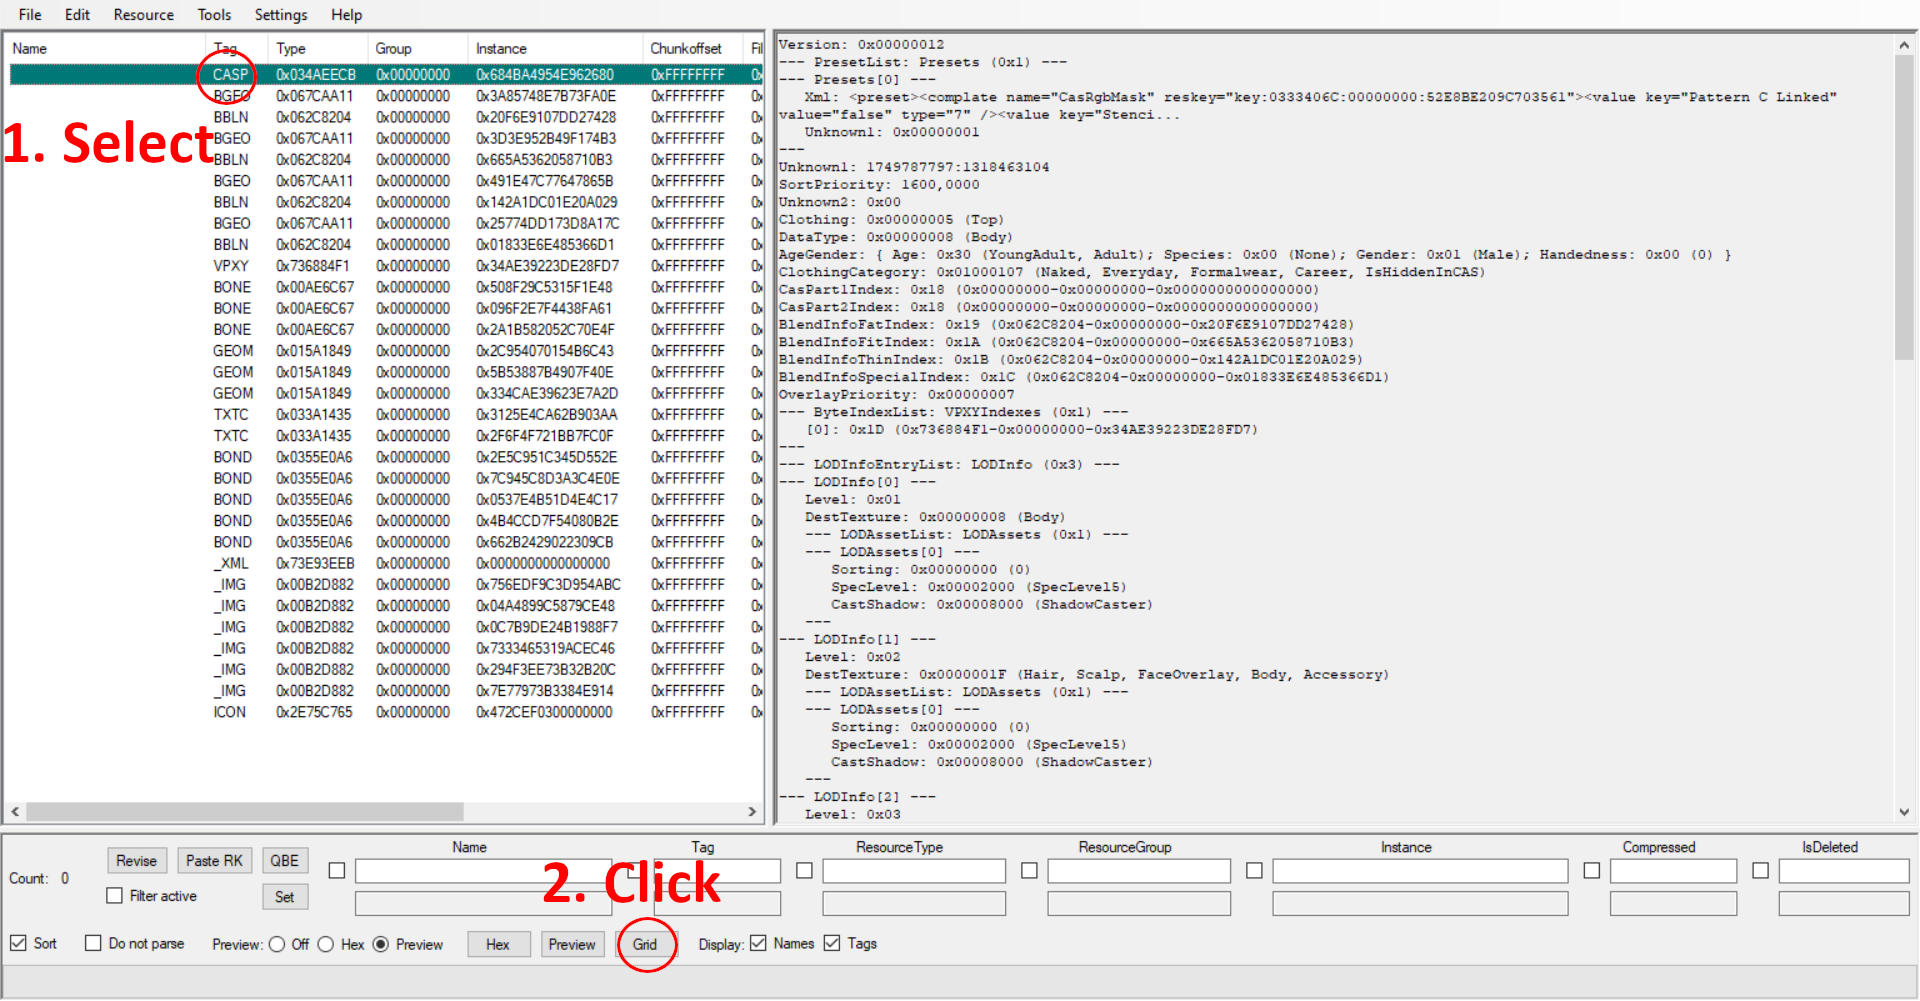
First of all, each item in this list is called a resource, which can be a lot of things — an xml file, an image or even an audio file. In our case, we're looking for the CASP resource, which holds basic information about the cc, which the game uses to display it in game. To find it, take a look at the Tag column starting from the top and moving downwards. You should be able find a line tagged as CASP in capital letters. Click on that line to select it and then look for the Grid button at the bottom of the program — click it. This should open a small popup titled Data Grid. This is where we can change things.
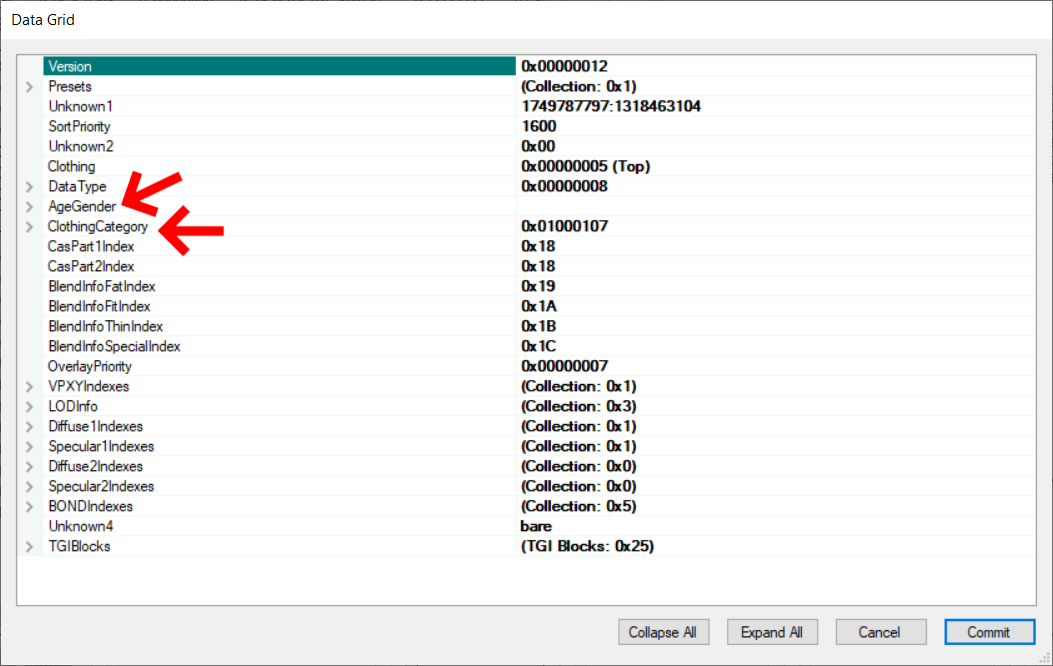
Look for AgeGender and ClothingCategory.
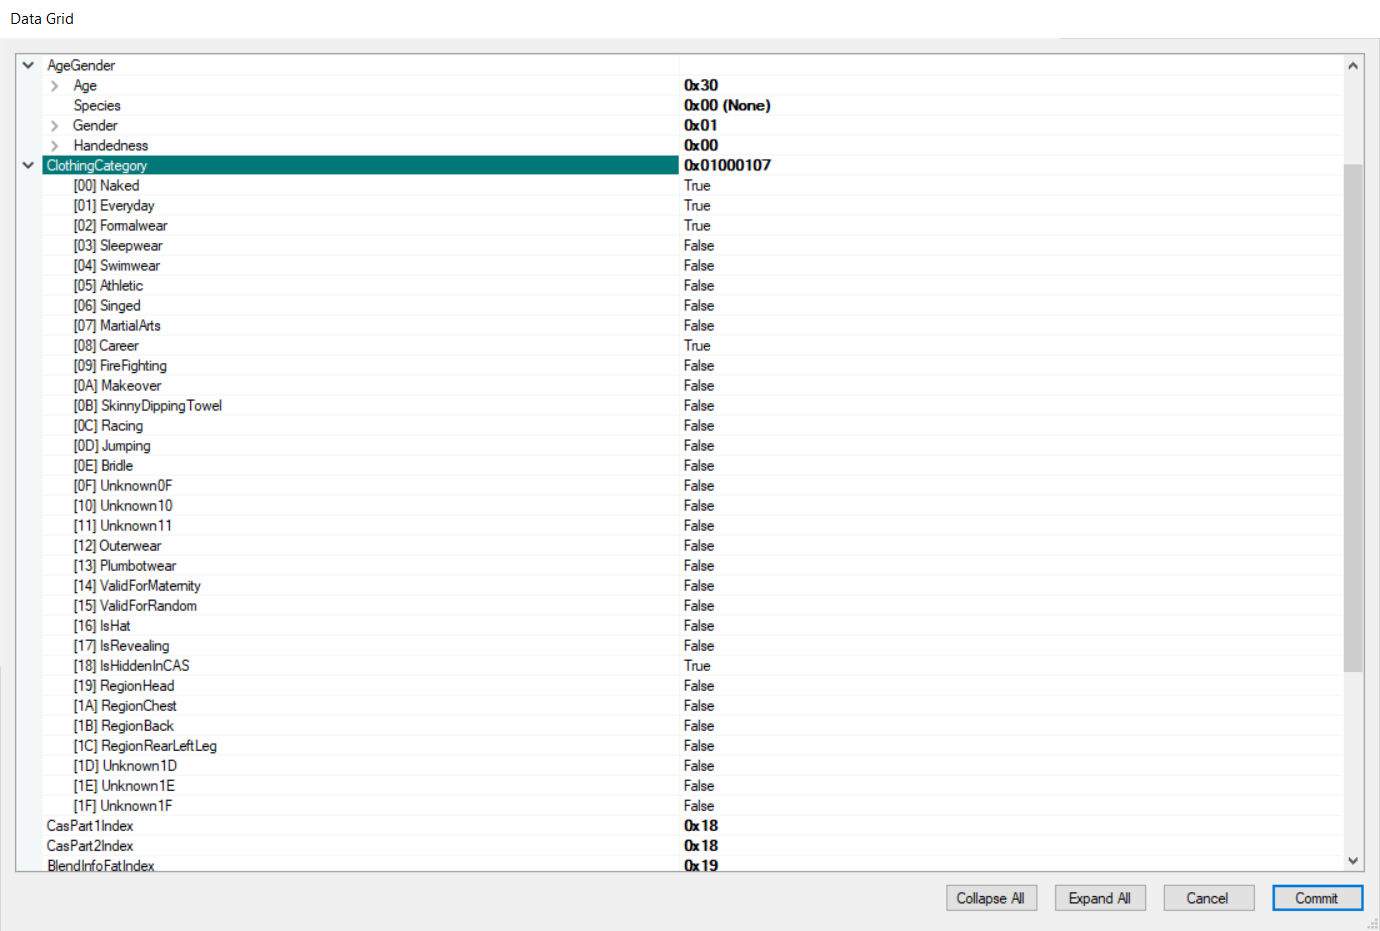
AgeGender
Age
Under Age we can set the age groups the game will make this cc available to. I'm not sure if you can change this freely but if you ever need to do so, you'll know where to find it. If I were to take a guess, items tagged as YoungAdult or Adult are less likely to cause issues if set for Elders or Teens, however toddler or children cc may not be set to any other ages. Please don't make any changes to this, unless you know what you're doing.
Gender
This simply sets the gender for the cc. You may not change this for tops and bottoms but a lot of accessories, tattoos and body hair can be safely worn by both genders.
ClothingCategory
The most important tags are [01]Everyday, [02]Formalwear, [03]Sleepwear, [04]Swimwear, [05]Athletic, [08]Career and [12]Outerwear. These tags tell the game in which of the CAS categories to make the cc available. This can be very useful in a variety of cases — for example, a jacket that doesn't appear in outerwear or high heel shoes that can be worn as sleepwear.
Some less common but generally useful tags are the [0]Naked, [14]ValidForMaternity, [15]ValidForRandom, [17]IsRevealing and [18]IsHiddenInCAS tags:
- [0]Naked: This tells the game to make the cc available in the naked category. It's a category just like the 7 aforementioned ones but it can only be accessed with mods. You shouldn't need to change this, unless you want to customize your sims' naked outfit.
- [14]ValidForMaternity: This should only be set to true for maternity clothes, which is clothes that can be worn by a pregnant sim (please note that the gender of the clothes doesn't matter). Pregnancy items must have a special pregnancy mesh, so don't change this, unless you're dealing with a mistagged piece of maternity cc.
- [15]ValidForRandom: This is one of the most commonly edited tags. It tells the game whether it can use an item when creating a new, randomly generated sim. Very useful for cc that's too "special" or weird for inactive sims to wear, which can be anything from occult related stuff, historical clothing, lewd clothing, extreme skin details or just about anything you'd only like your active sims to wear.
- [17]IsRevealing: This tells the game whether a given piece of clothing reveals a lot of skin. According to update 8 on Simler90's Fixes mod page, it's a remnant of an abandoned feature that invloved sims changing outfits in certain situations or cheering instead of booing at inappropriately dressed sims. Setting it doesn't really affect anything in the game as far as I can tell but I have downloaded cc tagged as revealing. Personally, I like to enable it for all my revealing cc.
- [18]IsHiddenInCAS: It makes cc not appear in CAS. A lot of EA items have this tag, such as the alien outfit or the mermaid tails; some of them are also scripted to appear under certain conditions. However, as far as I know, all of the hidden items can be revealed with the console command unlockoutfits on. This means you could hide the cc you don't use very often and only get it to show up when you actually need it! This command also allows you to remove otherwise unremovable EA items, such as the mermaid leg scales, which a lot of people dislike, by making them visible in CAS.
Once you're done with editing, click the Commit button at the bottom right and save. If you've made a mistake, you can click the Cancel button.
Editing sliders
The only thing I know how to do when it comes to custom sliders is disabling them for the randomization button in CAS. I'm basing this tutorial on the information I've found in this post.
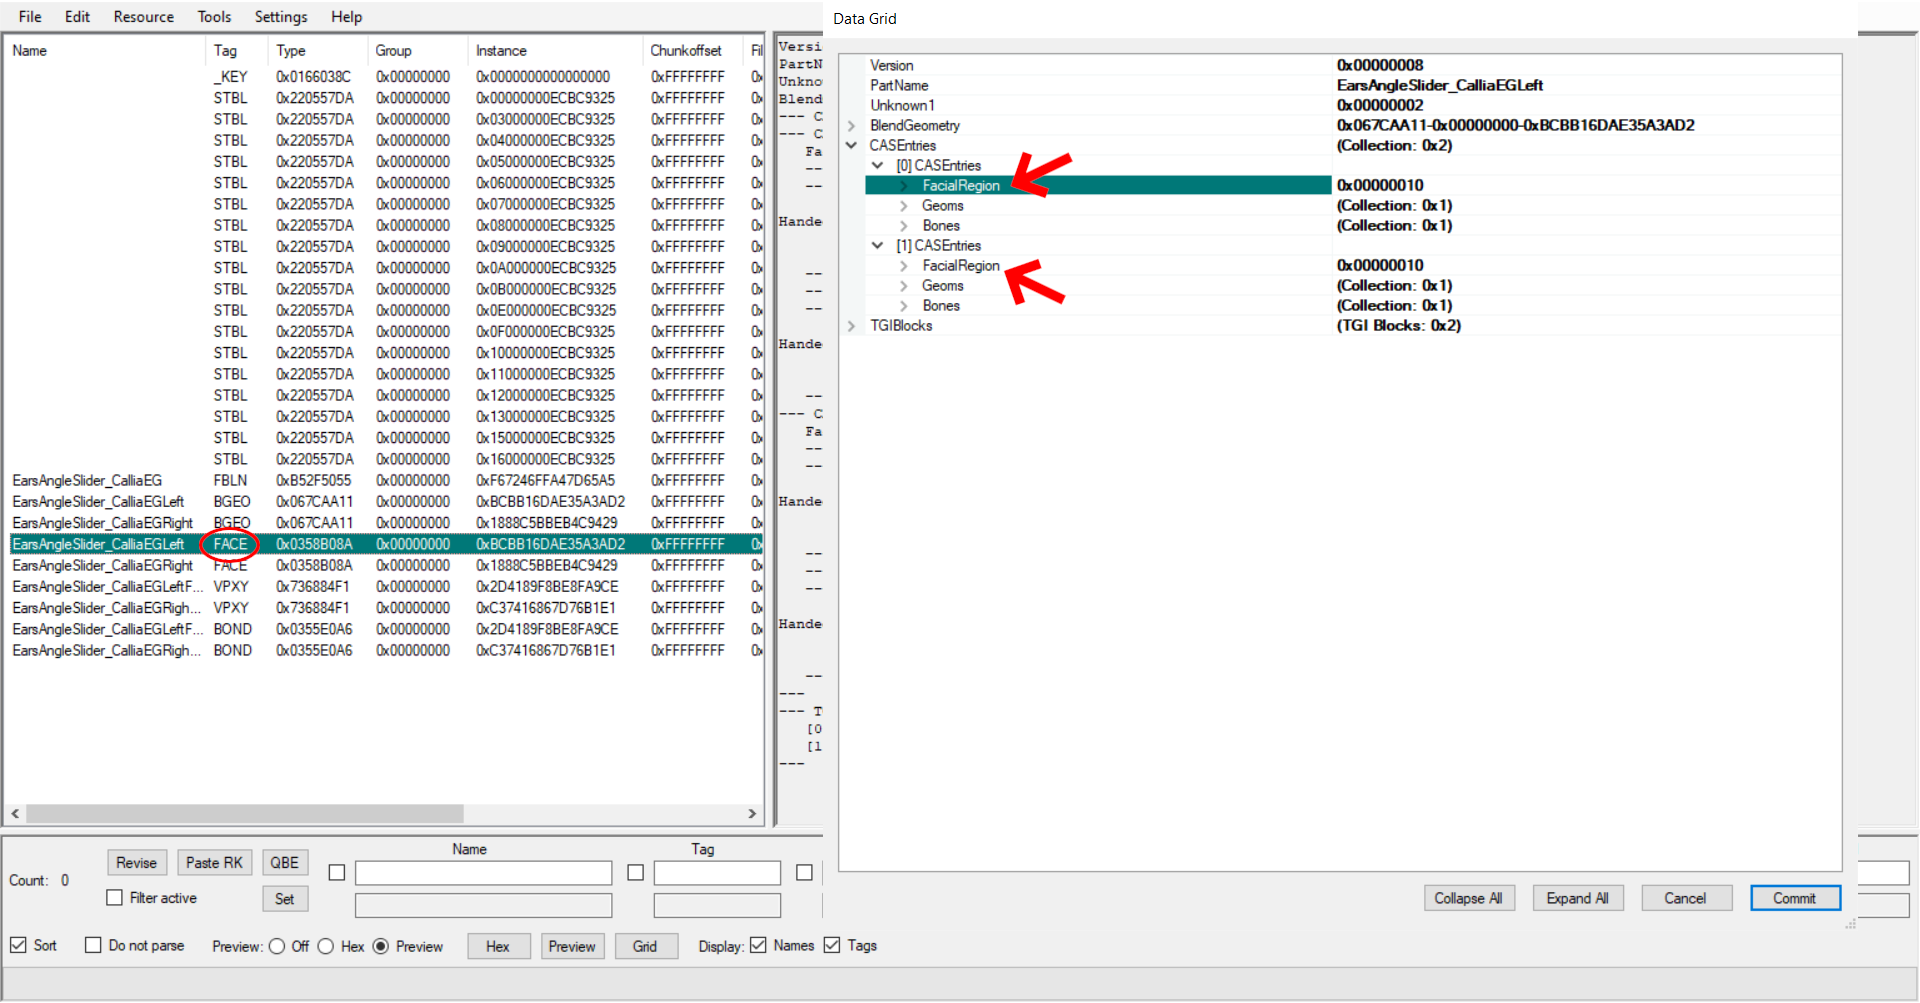
- After opening the slider in s3pe, select its FACE resource and click on the Grid button at the bottom of the program.
- Click on the arrow next to the CASEntries
- Set the FacialRegion to 0x00000000
After doing that, the slider you've edited shouldn't be affected by the randomization button in CAS. This is useful, because sometimes custom sliders can make some really weird looking sims.