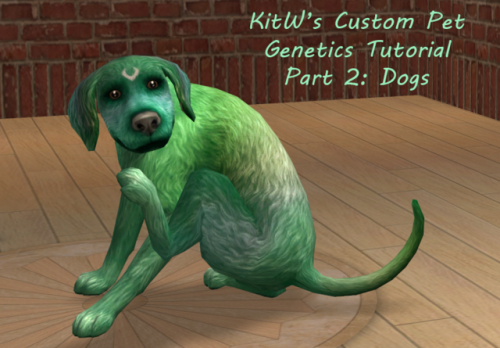
Custom Pet Genetics Tutorial: Dogs
Project: Pet Custom Content
by NekoKyu
Uploaded June 27, 2025, 1:54 a.m.
Updated June 27, 2025, 1:54 a.m.
It’s time for my Custom Pet Genetics Tutorial Part 2: Dogs. Just in case there are those who are only interested in Custom Dog Genetics and thus didn’t read the cat version, the beginning half of this tutorial will be extremely similar to Tutorial Part 1: Cats. So to those who have read the cat part, expect there to be much repeating, especially so with custom markings.
Dogs have a few specific difference from cats that make their custom genetic process a bit more complicated though, which is why I decided to split the tutorial into two parts. These complications include dogs being available in both big and small sizes, they have 5 different fur types, 2 possible ear options, and they have a unique collection of accessory furs.
Just like before, this process will require the use of SimPE and a picture editing program. The use of Milkshape will again be featured in this tutorial, but Milkshape related steps are not a requirement to the creation of pet genetics.
For this tutorial, I’ve uploaded a dog genetics making kit here: http://simfileshare.net/download/567992/. Make sure to download it before starting. Also included in the tutorial kit is my MaxisAccFurDogFix, which are a requirement to keep in your game if you want any custom fur colors to be breed-able with Maxis furs (also without it accessory furs are very vulnerable to glitching white). As this tutorial will cover the making of new coat colors and coat markings, be sure to read carefully. When it is necessary to differentiate between them, coat colors will again be marked with A. and patterns/markings will be marked with B.
Step 1: It’s time to create your new coat color or marking.
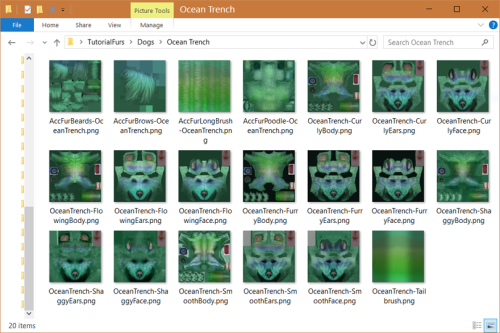
1-A. For new coat colors, there are 10 folders containing images for you to recolor. These folders are ‘AccFurBeard’, ‘AccFurBrow’, ‘AccFurLongBrush’, ‘AccFurPoodle’, ‘Curly Furs’, ‘Flowing Furs’, ‘Furry Furs’, ‘Shaggy Furs’, ‘Smooth Furs, and ‘Tailbrush’. Go into all 10 of these folders and recolor the images inside them to your desired color.
The Accessory Furs and Tailbrush will only need one image to be created. However, the fur type folders each will need 3 new images created: a body, a face, and an ears. When finished with the body, face, and ears, there are three psd files in the Tutorial Kit’s main folder. They are ‘Dog Body Template’, ‘Dog Face Template’, and ‘Dog Ears Template’. They contain isolated images of a dog’s mouth, nose, nails, and paw pads for easy layering over your new images, so feel free to use them if you’d like. PS-Shaggy furs don’t need nails, since the fur is supposed to be long enough to cover them.
Save your new images. Make sure each is clearly named with what it is for, such as if it’s for Shaggy Face, Smooth Body, or AccFurPoodle. In the end, you should have a max of 20 new images.
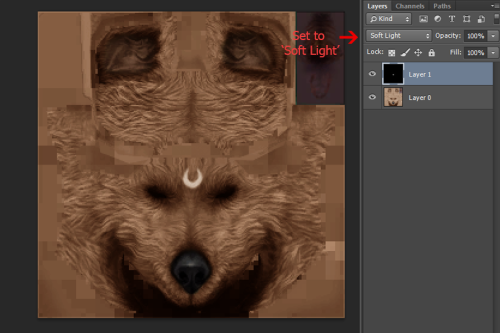
1-B. For new patterns or markings, locate the folder ‘zPatterns’ in your tutorial kit. Inside are three images called 'Full Body’, 'Full FaceEars’, and 'Full Tailbrush’. Just like with the cats, these are each extractions of the marking 'fullbody’ from the game, but for dogs. Open these up in Photoshop or the editor of your choice and use them to help create your marking. White is the pattern and black is the absence of the pattern, while grey is a semi-transparent marking. When creating your marking, it is easiest to take the Full Body/Face images and layer as a “soft light” on top of one of the texture images in the Furry/Flowing/Smooth Fur folders.
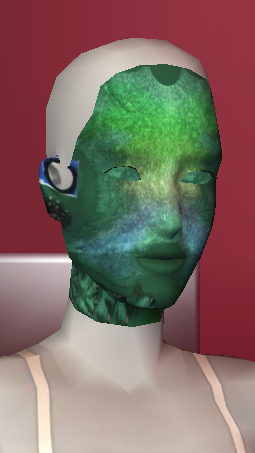
Before starting your marking, here are a few tips you should keep in mind: Like with cats, the tail is included in the body marking, so don’t forget the tail section. Also, the right side of the body and tailbrush images will apply to the pet’s right side when used (in other words, your left). However, unlike cats , the right side of the bottom of the face image will apply to the pet’s left side when in use, and the left side of the top of the face will apply to the left. That’s right, the texture mapping of the dog face is on both the right and left side of the image. Also, to make it more confusing, the ear mapping is flipped upside down and the back of the neck mapping is on the sides of the image. Since my Venus - Right covers half the dog face, here’s the texture image I made as an example of what the mapping looks like.
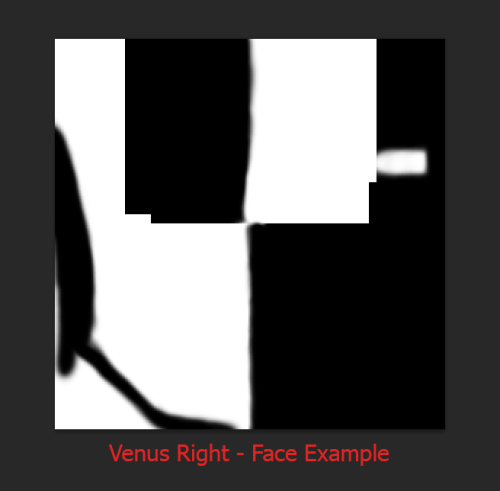
…Honestly, the mapping of dog face textures is a mess. It can quickly get pretty complicated and confusing. So I would suggest doing what you can and saving the more detailed bits for when you can see it applied in Milkshape.
Also, if you are creating a pattern that will affect the dog’s face, then you might have to create two face markings. The key word here is might. It depends on how much detail the marking will have, especially around the ears. Since dogs can have perky ears or long floppy ears, and both ear types have similar but different enough mappings, you may have to create a face image for both marking versions of the ears. We won’t know for certain until we see how the marking looks applied to a dog though. If you do create two face version, name the perky eared one Face Up, and the floppy eared one Ears Flop.
Oh, and just like before, you do not need to create all three/four images for your new pattern to work. You only need to create images for the sections of the body that the new pattern will apply to.
Lastly, as a reminder, custom dog markings also have the option of changing their appearance depending on the fur type applied. If you want a changing dog pattern, then make a copy of your finished pattern and edit it to how you would like it to look for each fur type. Make sure that you name each version with whether they are for curly, furry, flowing, shaggy, or smooth furs.
Step 2: A. &B. The optional, but highly suggested. Now we’re going to take a look at the new texture to be sure they match up. Inside the main folder of the Tutorial kit is a a file called 'Dog Mesh.ms3d’. If you have Milkshape, open up the ms3d file with it. Once it loads, you should see a fully combined simdog mesh, specifically the little dog mesh without any fur accessories included. The little dog and big dog meshes both share the same texture, so don’t worry. Click the Materials tab in the right-hand corner of the program. There are four materials already applied to the mesh for you which are named 'body’, 'faceup’, ‘faceflop’ and 'tailbrush’. Apply your newly create body texture to the body material like so:
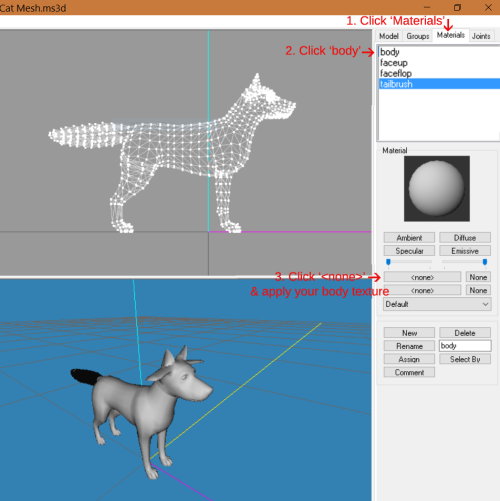
The mesh’s body and tail should magically change (if it doesn’t, right-click the mesh and make sure 'Textured’ has a checkmark beside it). Apply your face texture to the faceup material, ears texture to the faceflop material, and tailbrush texture to the tailbrush material in the same way. You should have a dog that appears similar to one of my examples here:
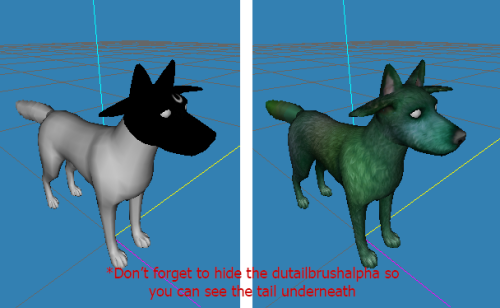
This is a lot easier then loading up and exiting your game to check the appearance of your marking after each new edit. Hide the faceup or faceflop group to check how the two different ear meshes look with your new textures applied. Pattern makers, if your pattern looks great on floppy ears but distorted on perky ears (or vice versa), then you need to make two individual marking images for the two ear types.
Check to be sure that the seams and details line up the way you want, and make any necessary adjustments to your texture images as you see fit. Keep re-applying the textures until you feel it to be perfect, then you can exit Milkshape. Don’t forget to save the finished versions of your coat color or pattern.
Steps 3-6 and their corresponding steps in 8-11 are exactly like with Part 1: Cats, but with two extra fur types added (so two extra repetitions). You will be creating a new ‘eye content’ using each of the newly created dog textures (1 tailbrush, 5 bodies, 5 faces, and 5 ears, none for the accessory furs). As such, 3-6 and 8-11 will not all apply to everyone depending on their own personal project. For example, if you are making only one fur type coat, or a marking that applies to only one part of the body. If a specific step does not apply to your project, it is safe to skip.
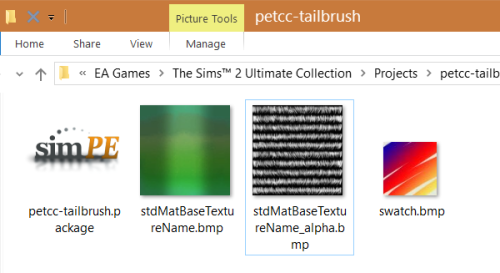
Step 3: A. &B. Open up your Sims 2 Bodyshop. Once it’s finished loading click 'Create Parts’ → ‘Start New Project’ → 'Create Genetics’ → 'Eye Color’. Pick any random eye color, then click 'Export Selected Texture’. Name the file ‘ PetCC-Tailbrush ’. When it has finished loading, go to your personal 'Projects’ folder located in your Documents/EA Games/Sims 2 folder. Find the folder that says PetCC-Tailbrush. Now grab your finished tailbrush texture file, and save it as a BMP file so that it replaces the ‘stdMatBaseTextureName.bmp’ file in this folder. Then grab the Tailbrush Alpha.bmp image in the tutorial kit and save it over the ‘stdMatBaseTextureName_ alpha.bmp’ file in this folder as well.
Reload your project in body shop and it should have a bunch of vaguely fur like rows across the sim mannequin’s face. If it does, then import the project into the game. Make sure to leave bodyshop ON once that is done.
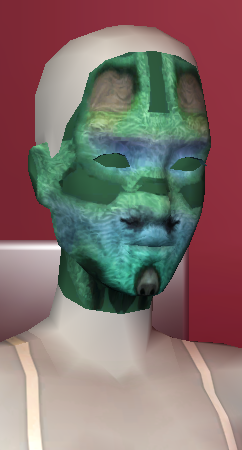
Step 4: A. &B. Create a new genetic project again. Pick any random eye color again, then click 'Export Selected Texture’. This time, name the file ‘ PetCC-FaceCurly ’ (For non-changing patterns, just name the project PetCC-Face). When it has finished loading, go to your Projects folder again and find the folder that says PetCC-FaceCurly. Now grab your finished face texture .bmp file, and save it so that it replaces the ‘stdMatBaseTextureName.bmp’ file in this folder. Then grab the Face Alpha.bmp image in the tutorial kit (yes, the blank white square) and save it over the ‘stdMatBaseTextureName_ alpha.bmp’ file in this folder as well. This time our new creation should look like one of these upon reloading:

Nice and weird, just the way we like it. Import PetCC-FaceCurly back into the game. Now coat color makers, repeat this step 4 more times , but for FaceFlowing, Furry, Shaggy, and Smooth. Pattern creators, you don’t need to repeat unless you want to.
Step 5: A &B. Once all your repeats are complete, create another new genetic project. Pick an eye color, click to export, and name this project PetCC-EarsCurly. In your projects folder, find your PetCC-EarsCurly folder. Grab and save your finished ears .bmp texture over the ‘stdMatBaseTextureName.bmp’ file, and the Face Alpha.bmp texture in the tutorial kit over the ‘stdMatBaseTextureName_ alpha.bmp’ file. Upon reloading, the project sim should kind of look like this:
Look at them ears! Perfect! Import PetCC-EarsCurly into the game. Then repeat this step 4 more times coat color creators , but for EarsFlowing, Furry, Shaggy, and Smooth. Once again, pattern makers don’t need to repeat unless they want to.
Step 6: A. &B. Once more, create a new genetic project. Pick an eye, and export. Name this file ‘ PetCC-BodyCurly ’. Then locate the PetCC-BodyCurly folder in your Projects folder. Grab and save your finished body .bmp texture over the ‘stdMatBaseTextureName.bmp’ file, and the Body Alpha.bmp texture in the tutorial kit over the ‘stdMatBaseTextureName_ alpha.bmp’ file. When you reload your project, you should be greeted with something like this:
Great job! Import PetCC-BodyCurly into the game. Then repeat this step 4 more times , again, but for BodyFlowing, Furry, Shaggy, and Smooth. Pattern creators, repeating is still optional. After you have finished all the repeats, exit Bodyshop.
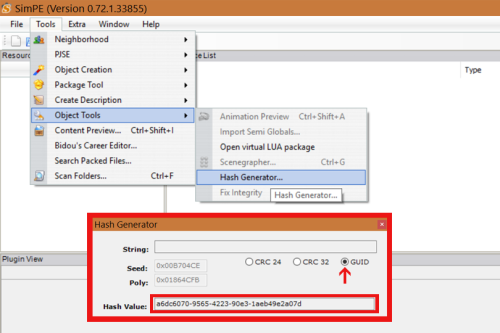
Step 7: A &B. Open up SimPE. Once it loads go to Tools → Object → Hash Generator. When the Hash Generator opens, click ‘GUID’. A 32-digit string of characters should appear in the ‘Hash Value’ bar. Copy + Paste it somewhere safe, such as a sticky note or word document. I will be referring to this string of characters as Our New Family.
7-A. Only. On the same sticky note or word document as Our New Family, you should also write down a Coat Number. You should choose a coat number that is not already in use so as to avoid conflict. Here is a list I compiled of coat numbers. Use it to find an available value for you to use. I will henceforth refer to the value you have chosen as Our New Coat Number.
Step 8: Go to the SavedSims folder in your Sims 2 folder. All of your newly created and imported PetCC packages should be there. There should be a minimum of 1 to 16 for markings, or 4 to 16 for coat colors. Find the PetCC-Tailbrush package that was created first, and open it with SimPE.
Once it loads, in the Resource List there should be only one XTOL file available, most likely starting with uuface_eye. Right-click the uuface_eye XTOL, then scroll down to and click on Replace.
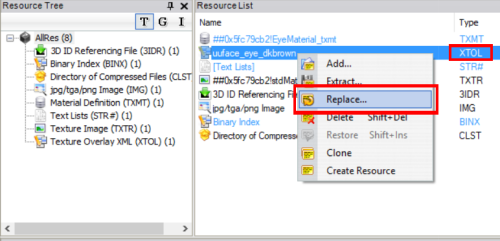
8-A. A new window will open up. With this window, go into my Tutorial Kit folder and find the folder labeled ‘[Coat Texture Overlays]’. Go inside and scroll until you find the file ‘Canine Tailbrush.xml.xml’. Make sure you grab the .xml.xml. file specifically. Once you select it and click ‘Open’ to confirm your choice in the window, a new pop-up will appear in SimPE that reads, “The Resource ‘uuface_eye’ was changed. Should SimPE reload it?” Click yes.
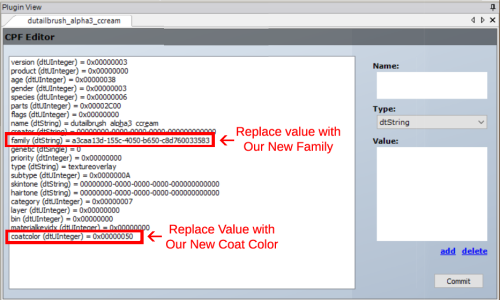
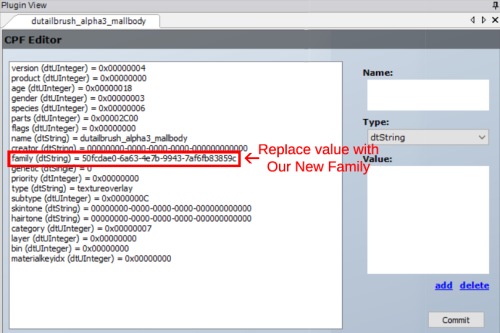
Uuface_eye will then change to the name ‘dutailbrush_alpha3_cream’. In the Plugin View of our new XTOL, change the value in ‘family (dtString)’ to Our New Family. Then change ‘coatcolor (dtUInteger)’ to Our New Coat Number.
Then hit ‘Commit’ and save. After, it should be safe to exit PetCC-Tailbrush.
8-B. When a new window opens up, use it to go into my Tutorial Kit folder. Inside is a folder called ‘[Pattern Texture Overlays]’. Double click it to enter, and find the file ‘Canine Tailbrush Pattern.xml.xml’. Make sure to grab the .xml.xml file specifically. Select the file and click ‘Open’ to confirm, then a new pop-up will appear in SimPE. It should say something similar to “The Resource ‘uuface_eye’ was changed. Should SimPE reload it?” Click yes.
Uuface_eye will then change to dutailbrush_alpha3_mallbody. Now in the Plugin View of our new XTOL, change the value in ‘family (dtString)’ to Our New Family.
Hit Commit, and save. That’s it, you can close out of tailbrush.
Step 9: 9-A. Next, open up PetCC-BodyCurly with SimPE. Once again, you will need to find the only XTOL file in the package, right-click it and select ‘Replace’ in the menu pop-up. When the selection screen comes up, go to the ‘[Coat Texture Overlay]’ folder in the Tutorial Kit. From there, select the file ‘Canine Curly Body.xml.xml.’
After your double-click Canine Curly Body, the pop-up will appear in SimPE again. Click yes again. This time, uuface_eye will change it’s name to ‘dubodycr_ccream’. Just like before, in the Plugin View change the values in family (dtString) and coatcolor (dtUInteger) to Our New Family and Our New Coat Number, respectively. Again, Commit your changes, then save and (possibly) exit. Then repeat this step 4 more times, only for BodyFurry, BodyFlowing, BodySmooth, and BodyShaggy.
If you only wish to make one fur texture that applies to all five fur types instead of individual textures, you will need to change the XTOL’s petcoats value. More information available in Bonus Info.
9-B. Open up PetCC-Body with SimPE. Find the uuface_eye XTOL, right-click it and select ‘Replace’. In [Pattern Texture Overlay] double click the ‘Canine Body Pattern.xml.xml’. Say Yes to the familiar pop-up. Now uuface_eye should then become dubodyfr_mallbody. In the Plugin View change the value in family (dtString) to Our New Family. Hit Commit, then save and you’re done.
If you only want your marking to apply to one or two coat types and not all five, then you will need to change the XTOL’s petcoats value. More information available in the Bonus Info.
Bonus Info - In case anyone would like to know, the values that tell the game what kind of coat texture a fur or marking is for is called ‘petcoats (dtUInteger)’. Smooth has a petcoat value of 1, Shaggy has a value of 2, Furry has a value of 4, Flowing has a value of 8, and Curly has a value of 10. All five textures combined have a petcoat value of 25, which is achieved by adding the three individual values together (8+4+1+2+10=25). In the XTOL’s plugin view, simply locate the petcoats (dtUInteger) line and change the value to the value you wish your fur or pattern to be for.
Step 10: 10-A. Now this time open up PetCC-FaceCuly with SimPE. Just like with the tailbrush, you will need to find the only XTOL file in the package, right-click it and select ‘Replace’ in the menu pop-up. When the selection screen comes up, go to the ‘[Coat Texture Overlay]’ folder in the Tutorial Kit. From there, select the file ‘Canine Curly Face.xml.xml.’ Make sure it’s the .xml.xml file you select.
After your double-click Canine Curly Face, the pop-up will appear in SimPE again. Click yes again. This time, uuface_eye will change it’s name to ‘dufacecr_ccream’. Just like before, in the Plugin View change the values in family (dtString) and coatcolor (dtUInteger) to Our New Family and Our New Coat Number, respectively. Hit Commit, then save and exit. And then, dear coat color makers, repeat this step 4 more times, only for FaceFurry, FaceFlowing, FaceSmooth, and FaceShaggy.
Repeat: If you only wish to make one fur texture that applies to all five fur types instead of individual textures, then you won’t need to repeat. However, you will need to change the XTOL’s petcoats value. More information available in Bonus Info.
10-B. Next, open PetCC-Face with SimPE. When it loads, find the only uuface_eye XTOL again, right-click it and select ‘Replace’. This time, go back into the ‘[Pattern Texture Overlay]’ folder in the tutorial kit and select the file called ‘Canine Face Pattern.xml.xml’ (If your marking required two different face patterns due to the ear mapping, then choose the ‘Canine Ears Up Pattern.xml.xml’ instead). Click Yes to reload the resource, and uuface_eye should change to dufacesh_mallbody.
Back down in the Plugin View of our new XTOL, change the value in ‘family (dtString)’ to Our New Family. Hit Commit, and save. This now functioning pattern will now apply to all coat types: curly, shaggy, furry, smooth, and flowing.
Repeat: If you only want your marking to apply to one or two coat types and not all three, then you will need to change the XTOL’s petcoats value. More information available in the Bonus Info.
Step 11: 11-A. Now this time open up PetCC-EarsCurly with SimPE. Just like with the tailbrush and face, you will need to find the only XTOL file in the package, right-click it and select ‘Replace’ in the menu pop-up. When the selection screen comes up, go to the ‘[Coat Texture Overlay]’ folder in the Tutorial Kit. From there, select the file ‘Canine Curly Ears.xml.xml.’ Make sure it’s the .xml.xml file you select.
After your double-click Canine Curly Ears, the pop-up will appear in SimPE again. Click yes again. This time, uuface_eye will change it’s name to ‘duearscr_ccream’. Just like before, in the Plugin View change the values in family (dtString) and coatcolor (dtUInteger) to Our New Family and Our New Coat Number, respectively. Hit Commit, then save and exit. And then, dear coat color makers, repeat this step 4 more times, only for EarsFurry, EarsFlowing, EarsSmooth, and EarsShaggy.
If you only wish to make one fur texture that applies to all five fur types instead of individual textures, then you won’t need to repeat. However, you will need to change the XTOL’s petcoats value. More information available in Bonus Info.
11-B. If your marking did not require the creation of two different face pattern textures, then skip this step. If it did, then open PetCC-Ears with SimPE. When it loads, find the only uuface_eye XTOL again, right-click it and select ‘Replace’. This time, go back into the ‘[Pattern Texture Overlay]’ folder in the tutorial kit and select the file called ‘Canine Ears Flop Pattern.xml.xml’. Click Yes to reload the resource, and uuface_eye should change to duearfcr_mallbody.
Back down in the Plugin View of our new XTOL, change the value in ‘family (dtString)’ to Our New Family. Hit Commit, and save. This pattern will now apply to all coat types: curly, shaggy, furry, smooth, and flowing.
If you only want your marking to apply to one or two coat types and not all three, then you will need to change the XTOL’s petcoats value. More information available in the Bonus Info.
Step 12: At this point, any custom patterns should be nearly complete, whereas any custom coat colors should be half way complete. So now we’re going to take the time to make sure everything works, as it will be a lot easier to fix issues now then it would be later on. Take all of your PetCC packages, and place them back in your game if you took them out. Then boot up your game. Once it loads, go to Create-A-Family and make a simDog. Test out your new dog genetic to make sure it functions as you want it to. Change the cat’s fur type to curly, to shaggy, to furry, to smooth, to flowing, add patterns, etc.
Test each part of the fur to make sure your new dog genetic is complete. Once you’re satisfied with your results, you may exit the game.
Step 13: A &B. At this point, you should follow steps 13-18 of Part 1: Cats, but for your new dog packages. Said steps are about combining all the packages together, and then linking them all to the same textlist/tooltip and jpeg/thumbnail. Once finished, any custom patterns should finally be complete! Yay! However, custom coat colors still require a few more steps to create working accessory furs. (Interesting fact, there are files in the game indicating that Maxis intended for patterns to work on accessory furs as well, but said files are incomplete. Alas, what could have been…)
Step 14: A Only. In the tutorial kit’s main folder is a folder called ‘[AccessoryFurMeshes]’. It contains sim packages that use the dog accessory fur meshes on humanoid sims and is mandatory for custom fur creations. Place the folder in your game’s download folder and boot up Bodyshop again. Pattern makers, the remaining steps should not apply to your project. Congratulations, you’re done!

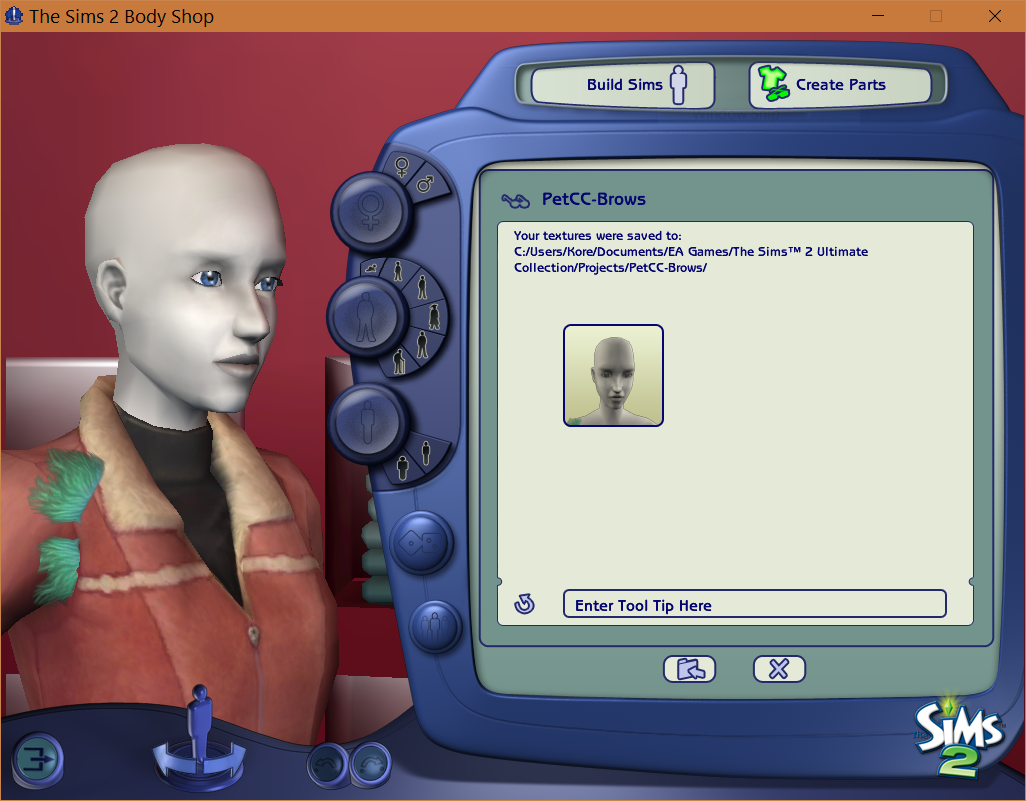
Step 15: A Only. When Bodyshop has loaded, click Create Parts → Start New Project → Create Facial Hair, Makeup & Glasses → Glasses. Find the dog brow accessory, it will have a tool-tip that says ‘KitW Base Dog Brows Template’. Click it, and your sim mannequin should have a vertical brow set appear just in front of their right shoulder. Export selected texture, then name the new project PetCC-Brows.
Then go into your projects folder and find your PetCC-Brows folder. Grab and save your finished brow .bmp texture over all of the ‘browalpha#~stdMatBaseTextureName.bmp’ files. There should be three: 3, 5, & 7. Reload your bodyshop project and the brows should change to your color. If so, Import To Game.
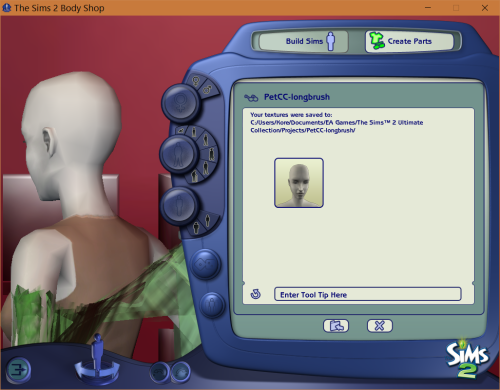
Step 16: A Only. After the importation is complete and the screen returns to the Create accessory/glasses screen, find the long tail flow accessory, tool-tipped as ‘KitW Base Dog Tail Flow Template’. Click it, and your sim mannequin will gain a weird shawl-thing that clips through their arms and back. Export and name the project PetCC-LongBrush.
Then in your projects folder find your newly made PetCC-LongBrush folder. Grab and save your finished long brush .bmp texture over all of the ‘tail_alpha#~stdMatBaseTextureName.bmp’ files. There should be three here too: 3, 5, & 7. Reload your bodyshop project and the tail shawl-thing should change to your color. If so, Import To Game.
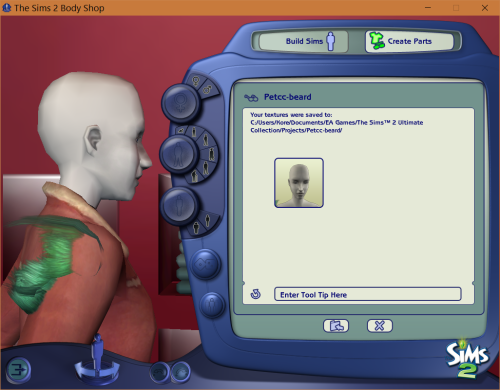
Step 17: A Only. After the importation is complete again, find the dog beard accessory, tool-tipped as ‘KitW Base Dog Beards Template’. Click it, and your sim mannequin will gain a beard clipping through their right shoulder. Export and name the project PetCC-Beard.
Now in your projects folder find your newly made PetCC-Beard folder. Grab and save your finished long brush .bmp texture over all of the ‘beardalpha#~stdMatBaseTextureName.bmp’ files. There should be five this time: 3, 5, 7, 9, & 11. Reload your bodyshop project and the shoulder beard should change to your color. If so, Import To Game.
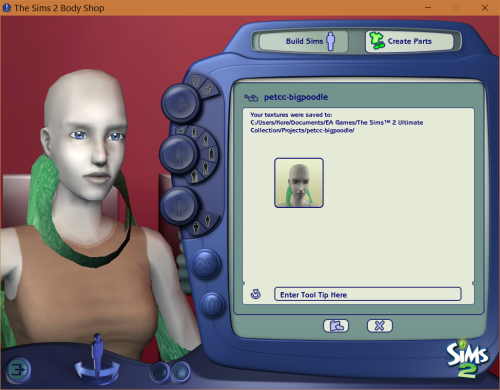
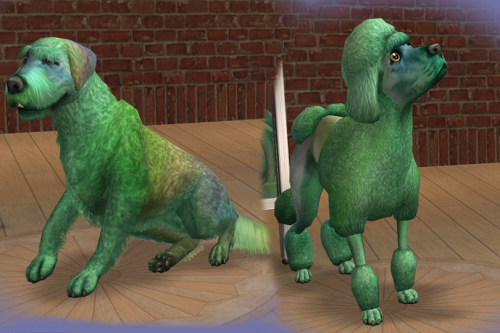
Step 18: A Only. After the importation is complete again, find the big poodle accessory , tool-tipped as ‘KitW Base Big Dog Poodle Template’. Click it, and your sim mannequin will gain a really weird growth clipping through their body. Export and name the project PetCC-BigPoodle.
Now in your projects folder find your newly made PetCC-BigPoodle folder. Grab and save your finished poodle .bmp texture over the ‘poodlebody~stdMatBaseTextureName.bmp’ file. There should be only one. Reload your bodyshop project and the all-consuming poodle growth should change to your color. If so, Import To Game.
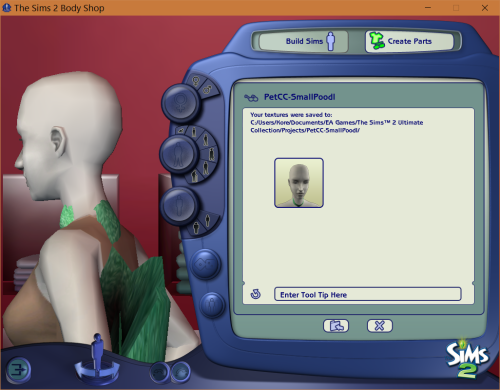
Step 19: A Only. After the importation is complete again, find the small poodle accessory this time, tool-tipped as ‘KitW Base Small Dog Poodle Template’. Click it, and your sim mannequin will gain a smaller sized growth clipping through them. Export and name the project PetCC-SmallPoodle.
Now in your projects folder find your newly made PetCC-SmallPoodle folder. Grab and save your finished poodle .bmp texture over the ‘poodlebody~stdMatBaseTextureName.bmp’ file, just like before. There should be only one, again. Reload your bodyshop project and the miniature growth should change to your color. If so, Import To Game. Then, exit bodyshop.
Step 20: A Only. Open up PetCC-Brows in SimPe. When it loads, click ‘Mesh Overlay XML (XMOL)’ in the Resource Tree. There should be one that says ‘Dog Brows - AF’, right click it and choose replace. When the menu pops up, go into my Tutorial Kit folder and find the folder labeled ‘[zAccessory Fur Overlays]’. Once inside, choose the file called ‘ Canine Brows.xml.xml ’. Then say yes to the ol’ so familiar pop up.
The file name should then change to ‘dufaceaccbrows - black’. In Plugin View, find the line that says ‘coatcolor (dtUInteger)’, and change it’s value to Our New Coat Number. Then hit Commit, and save.
Step 21: A Only. Open up PetCC-LongBrush in SimPe. When it loads, click ‘Mesh Overlay XML (XMOL)’ in the Resource Tree. There should be two XMOLs this time.
Right click the file that says ‘Big Dog Long Tailbrush - AF’ first, and click replace. When the menu pops up, go back into the ‘[zAccessory Fur Overlays]’ folder and choose ‘Canine Tailflow Brush Large.xml.xml’. Then say yes to pop up. The file name should then change to ‘dutailacclongbrushflowing - blue’. Then in Plugin View, find the line that says ‘coatcolor (dtUInteger)’, and change it’s value to Our New Coat Number. Then hit Commit.
Next, right click ‘Little Dog Long Tailbrush - AM’ and right click replace. In the menu, find and choose the file called ‘ Canine Tailflow Brush Small.xml.xml ’. Say yes to the pop up and the file name should then become ‘lutailacclongbrushflowing - blue’. In Plugin View, find the line that says ‘coatcolor (dtUInteger)’, and change it’s value to Our New Coat Number. Then hit Commit, and now save.
Step 22: A Only. Open up PetCC-Beards. Be prepared, because this will be a long one. When it loads, click ‘Mesh Overlay XML (XMOL)’ in the Resource Tree. There should be six XMOLs this time, so we will be replacing six times.
For Long Beards on Big Dogs: Right click the file that says ‘Big Dog Long Beards - AF’ first, and click replace. When the menu pops up, go back into the ‘[zAccessory Fur Overlays]’ folder and choose ‘Canine Beard Large Long.xml.xml’. Then say yes to pop up. The file name should then change to ‘dufaceaccbeardlong - blue’. Then in Plugin View, find the line that says ‘coatcolor (dtUInteger)’, and change it’s value to Our New Coat Number. Then hit Commit.
For Middle Beards on Big Dogs: Next, right click ‘Big Dog Middle Beards - TF’ and right click replace. In the menu, find and choose the file called ‘ Canine Beard Large Middle.xml.xml ’. Say yes to the pop up and the file name should then become ‘dufaceaccbeardmiddle - blue’. In Plugin View, find the line that says ‘coatcolor (dtUInteger)’, and change it’s value to Our New Coat Number. Then hit Commit.
For Short Beards on Big Dogs: Next, right click ‘Big Dog Short Beards - CF’ and right click replace. In the menu, find and choose the file called ‘ Canine Beard Large Short.xml.xml ’. Say yes to the pop up and the file name should then become ‘dufaceaccbeardshort - blue’. In Plugin View, find the line that says ‘coatcolor (dtUInteger)’, and change it’s value to Our New Coat Number. Then hit Commit.
For Long Beards on Small Dogs: Next, right click ‘Little Dog Long Beards - AM’ and right click replace. In the menu, find and choose the file called ‘ Canine Beard Small Long.xml.xml ’. Say yes to the pop up and the file name should then become ‘lufaceaccbeardlong - blue’. In Plugin View, find the line that says ‘coatcolor (dtUInteger)’, and change it’s value to Our New Coat Number. Then hit Commit.
For Middle Beards on Small Dogs: Next, right click ‘Little Dog Middle Beards - TM’ and right click replace. In the menu, find and choose the file called ‘ Canine Beard Small Middle.xml.xml ’. Say yes to the pop up and the file name should then become ‘lufaceaccbeardmiddle - blue’. In Plugin View, find the line that says ‘coatcolor (dtUInteger)’, and change it’s value to Our New Coat Number. Then hit Commit.
For Short Beards on Small Dogs: Next, right click ‘Little Dog Middle Beards - TM’ and right click replace. In the menu, find and choose the file called ‘ Canine Beard Small Short.xml.xml ’. Say yes to the pop up and the file name should then become ‘lufaceaccbeardshort - blue’. In Plugin View, find the line that says ‘coatcolor (dtUInteger)’, and change it’s value to Our New Coat Number. Then hit Commit, and finally save.
Step 23: A Only. Open up PetCC-BigPoodle in SimPe. When it loads, click ‘Mesh Overlay XML (XMOL)’ in the Resource Tree. There should be seven XMOLs this time.
Right click the file that says ‘Big Dog Poodle Flop Body - AF’ first, and click replace. When the menu pops up, go back into the ‘[zAccessory Fur Overlays]’ folder and choose ‘Canine Poodle Large Body Flop.xml.xml ’. Then say yes to pop up. The file name should then change to ‘dubodyaccpoodleflop - blue’. Then in Plugin View, find the line that says ‘coatcolor (dtUInteger)’, and change it’s value to Our New Coat Number. Then hit Commit.
Next click the file that says ‘Big Dog Poodle Up Body - AM’, and click replace. When the menu pops up, go back into the ‘[zAccessory Fur Overlays]’ folder and choose ‘Canine Poodle Large Body Up.xml.xml’. Then say yes to pop up. The file name should then change to ‘ dubodyaccpoodleup - blue ’. Then in Plugin View, find the line that says ‘coatcolor (dtUInteger)’, and change it’s value to Our New Coat Number. Then hit Commit.
Now right click the file that says ‘Big Dog Poodle Flop Ears - TF’, and click replace. When the menu pops up, go back into the ‘[zAccessory Fur Overlays]’ folder and choose ‘Canine Poodle Large Ears Flop.xml.xml’. Then say yes to pop up. The file name should then change to ‘duearsaccpoodleflop - blue’. Then in Plugin View, find the line that says ‘coatcolor (dtUInteger)’, and change it’s value to Our New Coat Number. Then hit Commit.
Next, right click the file that says ‘Big Dog Poodle Up Ears - TM’, and click replace. When the menu pops up, go back into the ‘[zAccessory Fur Overlays]’ folder and choose ‘Canine Poodle Large Ears Up.xml.xml’. Then say yes to pop up. The file name should then change to ‘duearsaccpoodleup - blue’. Then in Plugin View, find the line that says ‘coatcolor (dtUInteger)’, and change it’s value to Our New Coat Number. Then hit Commit.
Right click the file that says ‘Big Dog Poodle Flop Face - CF’, and click replace. When the menu pops up, go back into the ‘[zAccessory Fur Overlays]’ folder and choose ‘Canine Poodle Large Face Flop.xml.xml’. Then say yes to pop up. The file name should then change to ‘dufaceaccpoodleflop - blue’. Then in Plugin View, find the line that says ‘coatcolor (dtUInteger)’, and change it’s value to Our New Coat Number. Then hit Commit.
Right click the file that says ‘Big Dog Poodle Up Face - CM’, and click replace. When the menu pops up, go back into the ‘[zAccessory Fur Overlays]’ folder and choose ‘Canine Poodle Large Face Up.xml.xml’. Then say yes to pop up. The file name should then change to ‘dufaceaccpoodleup - black’. Then in Plugin View, find the line that says ‘coatcolor (dtUInteger)’, and change it’s value to Our New Coat Number. Then hit Commit.
Last time, right click ‘Big Dog Poodle Tailpuff - YF’ and right click replace. In the menu, find and choose the file called ‘ Canine Poodle Large Tailpuff.xml.xml ’. Say yes to the pop up and the file name should then become ‘dutailacclongpoodlepuff - blue’. In Plugin View, find the line that says ‘coatcolor (dtUInteger)’, and change it’s value to Our New Coat Number. Then hit Commit, and now save.
Step 24: A Only. This will be just like step 23, only for PetCC-SmallPoodle. As such, start by opening PetCC-SmallPoodle in SimPe. When it loads, click ‘Mesh Overlay XML (XMOL)’ in the Resource Tree. There should be seven XMOLs, again.
Right click the file that says ‘Little Dog Poodle Flop Body - AF’ first, and click replace. When the menu pops up, go back into the ‘[zAccessory Fur Overlays]’ folder and choose ‘Canine Poodle Small Body Flop.xml.xml ’. Then say yes to pop up. The file name should then change to ‘lubodyaccpoodleflop - blue’. Then in Plugin View, find the line that says ‘coatcolor (dtUInteger)’, and change it’s value to Our New Coat Number. Then hit Commit.
Next click the file that says ‘Little Dog Poodle Up Body - AM’, and click replace. When the menu pops up, go back into the ‘[zAccessory Fur Overlays]’ folder and choose ‘Canine Poodle Small Body Up.xml.xml’. Then say yes to pop up. The file name should then change to ‘ lubodyaccpoodleup - blue ’. Then in Plugin View, find the line that says ‘coatcolor (dtUInteger)’, and change it’s value to Our New Coat Number. Then hit Commit.
Now right click the file that says ‘Little Dog Poodle Flop Ears - TF’, and click replace. When the menu pops up, go back into the ‘[zAccessory Fur Overlays]’ folder and choose ‘Canine Poodle Small Ears Flop.xml.xml’. Then say yes to pop up. The file name should then change to ‘luearsaccpoodleflop - blue’. Then in Plugin View, find the line that says ‘coatcolor (dtUInteger)’, and change it’s value to Our New Coat Number. Then hit Commit.
Next, right click the file that says ‘Little Dog Poodle Up Ears - TM’, and click replace. When the menu pops up, go back into the ‘[zAccessory Fur Overlays]’ folder and choose ‘Canine Poodle Large Ears Up.xml.xml’. Then say yes to pop up. The file name should then change to ‘luearsaccpoodleup - blue’. Then in Plugin View, find the line that says ‘coatcolor (dtUInteger)’, and change it’s value to Our New Coat Number. Then hit Commit.
Right click the file that says ‘Little Dog Poodle Flop Face - CF’, and click replace. When the menu pops up, go back into the ‘[zAccessory Fur Overlays]’ folder and choose ‘Canine Poodle Small Face Flop.xml.xml’. Then say yes to pop up. The file name should then change to ‘lufaceaccpoodleflop - blue’. Then in Plugin View, find the line that says ‘coatcolor (dtUInteger)’, and change it’s value to Our New Coat Number. Then hit Commit.
Right click the file that says ‘Little Dog Poodle Up Face - CM’, and click replace. When the menu pops up, go back into the ‘[zAccessory Fur Overlays]’ folder and choose ‘Canine Poodle Small Face Up.xml.xml’. Then say yes to pop up. The file name should then change to ‘lufaceaccpoodleup - black’. Then in Plugin View, find the line that says ‘coatcolor (dtUInteger)’, and change it’s value to Our New Coat Number. Then hit Commit.
Last time, right click ‘Little Dog Poodle Tailpuff - YF’ and right click replace. In the menu, find and choose the file called ‘ Canine Poodle Small Tailpuff.xml.xml ’. Say yes to the pop up and the file name should then become ‘lutailacclongpoodlepuff - blue’. In Plugin View, find the line that says ‘coatcolor (dtUInteger)’, and change it’s value to Our New Coat Number. Then hit Commit, and now save.
Step 25: A Only. Grab the MaxisAccFurDogFix in my tutorial kit and all your new PetCC packages, both the coats and the accessory furs we just completed, and put them in your games Download folder. Before starting your game, go to the game’s main folder (Documents/EA/Sims 2) and delete your Accessory.cache files. Seriously, delete them. In some cases, the accessory furs require a hard reset of thumbnails in order to show up correctly when new ones are added, and while it doesn’t always happen it’s best to delete the cache anyway just in case.
Once your cache files have been deleted and the MaxisAccFurDogFix are in your game, start up Sims 2. Test out your new coat color, only this time add poodle puffs, beards, etc. Make sure all your accessory furs are in working order. Once satisfied, you may exit the game.
Step 26: A Only. Combine ALL of your remaining PetCC packages, this time with the new accessory furs included. Since accessory furs are technically “hidden”, don’t worry about their textlist/tool-tip files (”hidden” as in, individual recolors are hidden underneath a main recolor, thus only accessible by changing a pet’s base fur color. Even cheats will not unhide the recolors). Rename your new, fully combined package.
Congratulations! You have officially created a new custom pet genetic for canines! If you used the texture overlays I provided, then each new pet cc you’ve created should be genetically inheritable and also enabled for all ages. Also, any new custom fur colors will require my Kitten/Puppy Eye Fix, as well as the MaxisAccFurDogFix for dogs coat colors. And feel free to include my MaxisAccFurDogFix with any new dog furs you might share! Lastly, check out my new accessory fur conversion for puppies! A recolor kit is included as well if you want to recolor them in any of your new coat color creations. If both the adult templates and the puppy templates are in your download folder at the same time, they’ll recolor at the same time and create only one package!
Feel free to send me a link to your creations, as I would love to see what everyone will make!
