[TUTORIAL] Jazz scripts - Adding animations to your objects (FINISHED)
by Lyralei
Uploaded July 28, 2023, 2:51 p.m.
Updated Jan. 16, 2025, 8:41 p.m.
Hi everyone!
Jazz scripts, as modders we've all heard of them. I was one of those modders who avoided those like the plague, but once I was working on my sewing table I had no other choice than working with them. Once I did start working on them, they were actually quite easy to do! Problem is, is that other Jazz script tutorials (as amazing and helpful as they are!) are incredibly advanced in the information they share. Modders who know a bit about animating and a little bit of scripting will have issues understanding them because of it. So I really hope that this tutorial will fix any confusion you have about jazz scripts!
What we want to achieve at the end of this tutorial:
- A basic code setup that you can easily copy/paste into your Run().
- A basic Jazz script setup that you can always use and copy
- Understanding the basics of working with jazz scripts and how to link those to your C# script.
- A basic understanding of how props, CLIP files and actors are read by the game.
What this tutorial won't teach:
- How to create TS3 Animations (CLIP files). For that, check out these lovely tuts: https://www.youtube.com/watch?v=Fdb...RX75fz5T6Rxm-KT
- How to code. (Although this tutorial will have a lot of stuff you can simply copy/paste, so don't get thrown off by that ;)).
What you need:
- An object to animate. I'll be using S3OC to clone the tissue box! So this can be any creation you made, or a TS3 object just to learn ;)
- This version of SmoothJazz
- S3PE
- Blender
- ClipTool:
- Any code editor (SharpDevelop or Visual Studio or anything you code your C# scripts in. I personally use SharpDevelop and will be using that in this tutorial).
- Having set up your code properly for objects (See: http://www.modthesims.info/wiki.php...ObjectModding_) And (http://www.modthesims.info/wiki.php...Studioproject)
Let's get started!
The C# part
Let's open up our Visual studio/SharpDevelop/etc. If you've followed the Sims 3 Object modding tutorial, you should have something like this:
    namespace Sims3.Gameplay.Objects.YOURUSERNAMEHERE
    {
        public class MovingTissues: GameObject
        {
            public class MoveMyTissues : Interaction
            {
                public class Definition :  InteractionDefinition
                {
                    public override string GetInteractionName(Sim actor, MovingTissues target, InteractionObjectPair interaction)
                    {
                        return "Move the tissues!";
                    }

                    public override bool Test(Sim actor, MovingTissues target, bool isAutonomous, ref GreyedOutTooltipCallback greyedOutTooltipCallback)
                    {
                        return true;
                    }
                }
                public static InteractionDefinition Singleton = new Definition();

                public override bool Run()
                {
                    return true;
                }
                public override void OnStartup()
                {
                    base.AddInteraction(MoveMyTissues.Singleton);
                }
            }
        }
    }
If not, feel free to copy this :D
With Jazz scripts, I always like to imagine in words, what exactly I want. In this case, we want the following:
- I want to first let the game know which object and/or sim I want to animate
- I then want it to start running
- Then, after the animation is done playing, I want the animation to stop playing. As well as my sim to stop using it
Pretty straightforward stuff, right? Now, if you're working on something intenser than just animating a tissue box and a sim, this is definitely a great thing to write down in your 'run()' function (Well, as long as you use the commenting syntaxes ;))
Getting acquainted with the tools/code we can use:
You might have seen EA's run functions on objects that has a lot of animation and code that has all sorts of checks. But in reality it's quite easy stuff if you strip out the checks and logistics of those. Let's get over all the regularly used functions for initiating an animation:
**base.StandardEntry();**
Tells the game that the object and interaction will currently be used and setting up the 'LookAt' function. (unless, you turned this off by using the moviemakercheatsenabled cheat. The code will still run though!)
base.EnterStateMachine("TissueBoxAnim", "Enter", "x");
Takes 3 parameters:
1. " TissueBoxAnim" - is the name of the statemachine (jazz script).
2. " Enter" - is the name of the 'enter state'.
3. "x" - is your sim (also known as the actor).
4. base.EnterStateMachine() - Enter state machine is the part where the game searches for your jazz script and goes right to the "enter" function in our Jazz script. More on that later of course ;)
NOTE:
1. You can name the statemachine ('tissueBoxAnim') anything you like it to be! We'll be using this name later in our Jazz script.
2. Always use 'x' in this piece of code. "x"
3. COPY PASTE YOUR ENTER STATE MACHINE FUNCTION IN NOTEPAD!! This is merely so that we can look back at it once we get to the jazz script.
// OBJECT:
base.SetActor("TissueBox_object", base.Target);
Takes 2 parameters:
1. "TissueBox_object" is the name I'm giving my object. Later on, we'll reference the object in the Jazz script this way.
2. base.Target - here is where the C# script and the Jazz script work together and figure out who we mean as "TissueBox_object". See it like this: You know someone's name, but once you point at the person, you know who they are and what they look like!
3. base.SetActor(); - This function is, as I said before, a way for the C# script and Jazz script to work together. To visualise who this name belongs to ;) And, it initiates the actors as well as checking if the actors even exist!
NOTE:
1. "Why does it think my object is an actor?". Basically, see it as 'who needs to move/animate?'. After you know, you also know that they need to become an actor. Despite being human or not. ;)
2. Adding a second object to be an actor, you'd do like this:
//GET OBJD KEY TO CREATE A GAMEOBJECT
mFabric = (SewingTable_ClothProp)GlobalFunctions.CreateObject(ResourceKey.FromString("0x319E4F1D:0x00000000:0x0361BDCA336A8546"), slotPosition, 0, forwardOfSlot, null, null);
// CHECK IF OBJD KEY WAS FOUND AND OBJECT EXISTS
if(mFabric != null)
{
             base.SetActor("fabric", mFabric); // See how we call it "fabric" and then point at the variable? This is super important!
}
base.EnterState("x", "Enter");
Takes 2 parameters:
"x" - is what we told it being the sim actor (See EnterStateMachine());
"Enter" - Is, again, the name of the 'enter state'. However now it's interesting since it will look and run this function. Base.EnterStateMachine(), however just checks if there's an enter state ;)
base.EnterState(); - Runs the 'Enter' Script inside of the Jazz code. It also runs this code on the "x" actor (our sim!) We'll get over this in a bit once we get to the jazz scripts!
base.AnimateSim("Exit");
Takes one parameter:
"Exit" - This is the name of our 'exit state'. We remember the enter state, which enters the animation. in this case, we exit the animation.
base.AnimateSim(""); - The function is actually a simplified "enterState()" function. It will always focus on the "x" actor. So all we say here is "hey look at the Exit function inside the jazz script!" This of course only works with sims.
//ONLY IF YOU HAVE A SUPER COMPLEX ANIMATION GOING ON, USE THIS:
base.RequestState("TissueBox_object", "DoASpinWooh!");
Takes 2 parameters:
"TissueBox_object" - Our tissuebox actor ;) See the "SetActor()" function for clarification.
"DoASpinWooh!" - The state name of the function inside the jazz script! I just called it DoASpinWooh, in case anyone wants it to do something awesome ;) But this could well just be "Exit" or "Enter" though.
base.RequestState() - Runs the animation 'state' (DoASpinWooh in this case) And applies it on the, in this case, TissueBox_object actor! :) It really is just a less simplified version of the function base.AnimateSim.
//ONLY USE THIS IF YOU GOT SKILL OR TRAIT STUFF GOING ON
base.BeginCommodityUpdates();
As far as my research has gone, this helps the traits and skills being recognised :) (And I think buffs too?)
base.StandardExit();
Stops the Jazz script and makes sure that the game knows that this sim isn't animating anymore. You need to always end your animation this way! This is what will happen if you don't is this:
Quote:
Originally Posted by Zoe22
Another thing that happened (though I couldn't recreate this, so maybe it's not really a bug, and more just a sim moment) was when my sim stopped sewing to go prepare some food, she was walking to the fridge and got stuck doing the animation, and so then would walk a little bit, sew in the air, walk a bit etc...
(See this thread for image illustration:http://www.modthesims.info/showthre...716#post5635716)
A BASIC WORKING SCRIPT YOU CAN USE:
But there's actually a 'basic' setup you can use on everything, or just use to start out with, which is:
    base.StandardEntry();
    base.EnterStateMachine("NameOfStateMachine", "Enter", "x");
    base.SetActor("NameOfActor", base.Target);
    base.EnterState("x", "Enter");
    base.AnimateSim("Exit");
    base.StandardExit();
This example is really all you need ever. I'll add some edge cases at the end of this post (Think about Loops, skilling, etc)
Our script should look like this now:
    namespace Sims3.Gameplay.Objects.YOURUSERNAMEHERE
    {
        public class MovingTissues: GameObject
        {
             public class MoveMyTissues : Interaction
            {
                public class Definition :  InteractionDefinition
                {
                    public override string GetInteractionName(Sim actor, MovingTissues target, InteractionObjectPair interaction)
                    {
                        return "Move the tissues!";
                    }

                    public override bool Test(Sim actor, MovingTissues target, bool isAutonomous, ref GreyedOutTooltipCallback greyedOutTooltipCallback)
                    {
                        return true;
                    }
                }
              public static InteractionDefinition Singleton = new Definition();

               public override bool Run()
                {
                    base.StandardEntry();
                   base.EnterStateMachine("TissueBoxAnim", "Enter", "x");
                   base.SetActor("TissueBox_object", base.Target); // base.Target = MovingTissues (Hover over the name in the InteractionDefinition to see what we defined as Target).
                   base.EnterState("x", "Enter");
                   base.AnimateSim("Exit");
                   base.StandardExit();

                   return true;
                }
               public override void OnStartup()
               {
                   base.AddInteraction(MoveMyTissues.Singleton);
               }
             }
        }
    }
        ```

This is literally all the code we need! :)

## EDGE CASES & EXIT REASONS - EXAMPLES

Now that we know what EA's Animation functions do and why they're there! We can finally get to bits where we'd want to loop our animation or even add skilling to our code. Only in these cases do we really need Exit Reasons, since most animations run for 10 seconds at most ;) I'll use my Sewing table code as an example, with an EA skill.

**LOOPING BASICS - EXITS ONLY WHEN SIM IS IN A BAD MOOD/PLAYER DIRECTED CANCEL**

```cs
    public override bool Run()            {
                    base.StandardEntry();
                    base.EnterStateMachine("SewingTable", "Enter", "x");
                    base.SetActor("sewingtable_table", base.Target);
                    base.EnterState("x", "Enter");
                    base.AnimateSim("Loop");

           // EA uses the 'Flag' variable for this. But when looping, it's important on each loop to return either 'true' or 'false'. An exit reason can return a false or true :) you can call this variable anything.
                    bool flag = DoLoop(ExitReason.Default, LoopInfinite, null);

                    base.AnimateSim("Exit");
                    base.StandardExit();

           // This is the only instance in a run() function to return a variable like this. Merely because of the 'DoLoop' function.
                    return flag;
                }
           // Our loop function. See how in: bool GainSkillOnLoop = DoLoop(ExitReason.Default, LoopInfinite, null); We call a function in the second parameter? :)
                 public void LoopInfinite(StateMachineClient smc, LoopData loopData)
                {
           //2 things here, if either we as the player cancel the animation OR the game notices that the sim is super hungry/has no fun/has to go to the toilet, we'll add the exit reasons.
                    if(Actor.HasExitReason(ExitReason.UserCanceled) || (Actor.HasExitReason(ExitReason.MoodFailure)))
                    {
                // AddExitReason so that we 'base.AnimateSim()' will be initiated
                           base.Actor.AddExitReason(ExitReason.UserCanceled);
                           base.Actor.AddExitReason(ExitReason.MoodFailure);
                    }
                }
bool flag = DoLoop(ExitReason.Default, LoopInfinite, null);
We always assign the DoLoop function to a bool variable. DoLoop always returns either true or false ever time a ClIP file starts again (So, say your CLIP Animation is 10 seconds long, DoLoop will check and return either true or false every time it restarts, which in this case is every 10 seconds ;))
takes 3 parameters:
ExitReason.Default - 'default' won't ever get met as an ExitReason, but is merely a placeholder for the function, so that, using the 10 seconds thing as an example, it will return a false every 10 seconds until another exit reason has been found. So always make this an ExitReason.Default. In our actual LoopInfinite function we'll give it a different exit reason.
LoopInfinite - this is the name I gave my function, DoLoop will call this function to check whether it should return a false or true. Right under where run() ends, we'll add a public void LoopInfinite function. The naming can be anything, so if you want to call it Spaghetti, go for it! Let's get to that one now actually!
    public void LoopInfinite(StateMachineClient smc, LoopData loopData)
    {
       if(Actor.HasExitReason(ExitReason.UserCanceled) || (Actor.HasExitReason(ExitReason.MoodFailure))
       {
          base.Actor.AddExitReason(ExitReason.UserCanceled);
          base.Actor.AddExitReason(ExitReason.MoodFailure);
       }
    }
The DoLoop will run the LoopInfinte every time the animation restarts. It will basically check whether the loop needs to end and what to do when it ends. In the case of this code we do the following:
if(Actor.HasExitReason(ExitReason.UserCanceled) || (Actor.HasExitReason(ExitReason.MoodFailure))
Every time the DoLoop gets into this function, we check whether the Player has cancelled the interaction or whether the sim is in a bad mood. The game knows about these HasExitReasons, but the C# script doesn't yet since we need to somehow return the 'true' on DoLoop. The true here means that the script needs to stop looping. Our if statement here will return the true to the function, as well as adding an exit reason :)
All the exit reasons you can use:
```cs
None
TimedOut
FailedToStart
RouteFailed
MoodFailure
HigherPriorityNext
UserCanceled
Finished
ObjectInUse
PriorityOverride
CanceledByScript
FailedToRemoveFromInventory
CancelledByPosture
InterruptionRequested
StageComplete
MaxSkillPointsReached
BuffFailureState
NullValueFound
PlayIdle
ObjectStateChanged
SuspensionRequested
MidRoutePushRequested
SynchronizationFailed
Replan
Default
SocializingFailed
Canceled
CancelExternal
CausesBlocking
**LOOPING WITH A SKILL:  **

```cs
     public override bool Run()            {
           // We ask the game to give/initiate the skill on the actor that's currently using the object. Even if they're level 10 or don't know the skill yet, this will be added.
                    PaintingSkill paintingSkill = base.Actor.SkillManager.AddElement(SkillNames.Painting) as PaintingSkill;
                    if (paintingSkill == null)
                    {
               // For good practise on a first run, make sure to add an [in-game notification](http://www.modthesims.info/showthread.php?p=5565700#post5565700) here to debug whether the skill has been loaded or not
                        return false;
                    }
           // Starts skill gaining. The Skilling bar will appear above the sim's head now.
                    paintingSkill.StartSkillGain(SkillNames.Painting);

                    base.StandardEntry();
                    base.EnterStateMachine("SewingTable", "Enter", "x");
                    base.SetActor("sewingtable_table", base.Target);
                    base.EnterState("x", "Enter");
                    base.AnimateSim("Loop");

           // EA uses the 'Flag' variable for this. But when looping, it's important on each loop to return either 'true' or 'false'. An exit reason can return a false or true :)
                    bool GainSkillOnLoop = DoLoop(ExitReason.Default, LoopInfinite, null);

                    base.AnimateSim("Exit");

           // Because we're exiting, we're also stopping skillgaining here.
                    paintingSkill.StopSkillGain();
                    base.StandardExit();

           // This is the only instance in a run() function to return a variable like this. Merely because of the 'DoLoop' function.
                    return GainSkillOnLoop;
                }
           // Our loop function. See how in: bool GainSkillOnLoop = DoLoop(ExitReason.Default, LoopInfinite, null); We call a function in the second parameter? :)
                 public void LoopInfinite(StateMachineClient smc, LoopData loopData)
                {
           //2 things here, if either we as the player cancel the animation OR the game notices that the sim is super hungry/has no fun/has to go to the toilet, we'll add the exit reasons.
                    if(Actor.HasExitReason(ExitReason.UserCanceled) || (Actor.HasExitReason(ExitReason.MoodFailure)))
                    {
                // AddExitReason so that we 'base.AnimateSim()' will be initiated
                           base.Actor.AddExitReason(ExitReason.UserCanceled);
                           base.Actor.AddExitReason(ExitReason.MoodFailure);
                    }
                }
LOOPING WITH A PROGRESS GOING ON:
```cs // OUTSIDE THE INTERACTION CLASS WE DEFINE THESE TWO VARIABLES:
        public static float Progress;
        public static bool IsComplete
      {
         get
         {
            return Progress >= 1f;
         }
      }
```cs

    public override bool Run()
                {
                   base.StandardEntry();

          base.SetActor("sewingtable_table", base.Target);
          base.EnterState("x", "Enter");

          // This defines how long a stage should play for. this is an important function to have for the progress
          SimpleStage simpleStage = new SimpleStage(GetInteractionName(), GetTimeToCompletion(), DraftProgressTest, true, true, true);
          base.Stages = new List(new Stage[1]
          {
             simpleStage
          });
                    base.BeginCommodityUpdates();
          base.AnimateSim("Loop"); // Loop here is my state method inside my jazz script. See the jazz script section in the tutorial for more

                   bool GainSkillOnLoop = DoLoop(ExitReason.Default, Loop, null);
                   if(Actor.HasExitReason(ExitReason.UserCanceled) || (Actor.HasExitReason(ExitReason.MoodFailure)))
                   {
                      base.AnimateSim("Exit");
                   }
                   base.EndCommodityUpdates(GainSkillOnLoop);
                   //sewingSkill.StopSkillGain();
                   base.StandardExit();
                   if (mFabric != null)
                {
                        mFabric.UnParent();
                   mFabric.Destroy();
                   mFabric = null;
                }
                   return GainSkillOnLoop;
                }


                public float DraftProgressTest(InteractionInstance instance)
             {
                return Progress;
             }

                public void Loop(StateMachineClient smc, LoopData loopData)
                {
                   Progress += loopData.mDeltaTime / 30f; // 30f is the minimum time it should loop. You can of course make this a variable too.

                   if(IsComplete)
                   {
                   base.Actor.AddExitReason(ExitReason.Finished);
                   base.AnimateSim("Exit");
                   }
                }

          // This should be placed at the area where you added your startup() function :)
             public static float GetTimeToCompletion()
            {
    // UNCOMMENT THE COMMENTED PART ONLY IF YOU WANT TO USE SKILLS
    //            PaintingSkill skill = ActorCurr.SkillManager.GetSkill(SkillNames.Painting);
    //            float num = MathHelpers.LinearInterpolate((float)0, (float)skill.MaxSkillLevel, (float)kBaseMinTimeMakeSewable, (float)kBaseMaxTimeMakeSewable, (float)skill.SkillLevel);
    //            if (num <= 0 || (num <= 0f ))
    //            {
    //                num = (float)kBaseMinTimeMakeSewable;
    //            }
             // 30f is just something I went with. it will take 3 hours for the sim to complete the progress
                return 30f; //If you go with skills use: return num;
            }

    ```


  ```cs
SimpleStage simpleStage = new SimpleStage(GetInteractionName(), GetTimeToCompletion(), DraftProgressTest, true, true, true);
base.Stages = new List(new Stage[1]
{
simpleStage
});
This is a super simple way to have it understand the progress and when to stop :) Now, SimpleStage is the "stage the interaction is in". So, whether the interaction should end or not!
GetInteractionName() - This is our interaction name! :) The function that's being called is our public override string GetInteractionName();. Which is somewhere at the start of when we make an 'interaction class'
GetTimeToCompletion() - This can be hardcoded like 1f. Else you can also add a function like I did :) This is especially recommended if you're using skills
DraftProgressTest - I actually don't know why this exists, except for that it checks how far the 'progression' is at. Now, replacing this with something like 1f * 30, does actually work ;)
First true - means 'ShowCompletionTime'. This is whether if you hover over the interaction ui block thingy, it shows something like "finished at 9:30am"
Second true - Is the Selectable. No idea what this is! :p but I assume this is whether you can cancel it or not?
Third true - is the VisibleProgress. Aka, should this green bar show up or not ;) Remember how your sim will have a green bar and it shows how long it takes to finish the book? That's that one.
The jazz script!
(If you don't have an animation/CLIP file yet, see using the pose Blender plugin stuff with objects, 4th post)
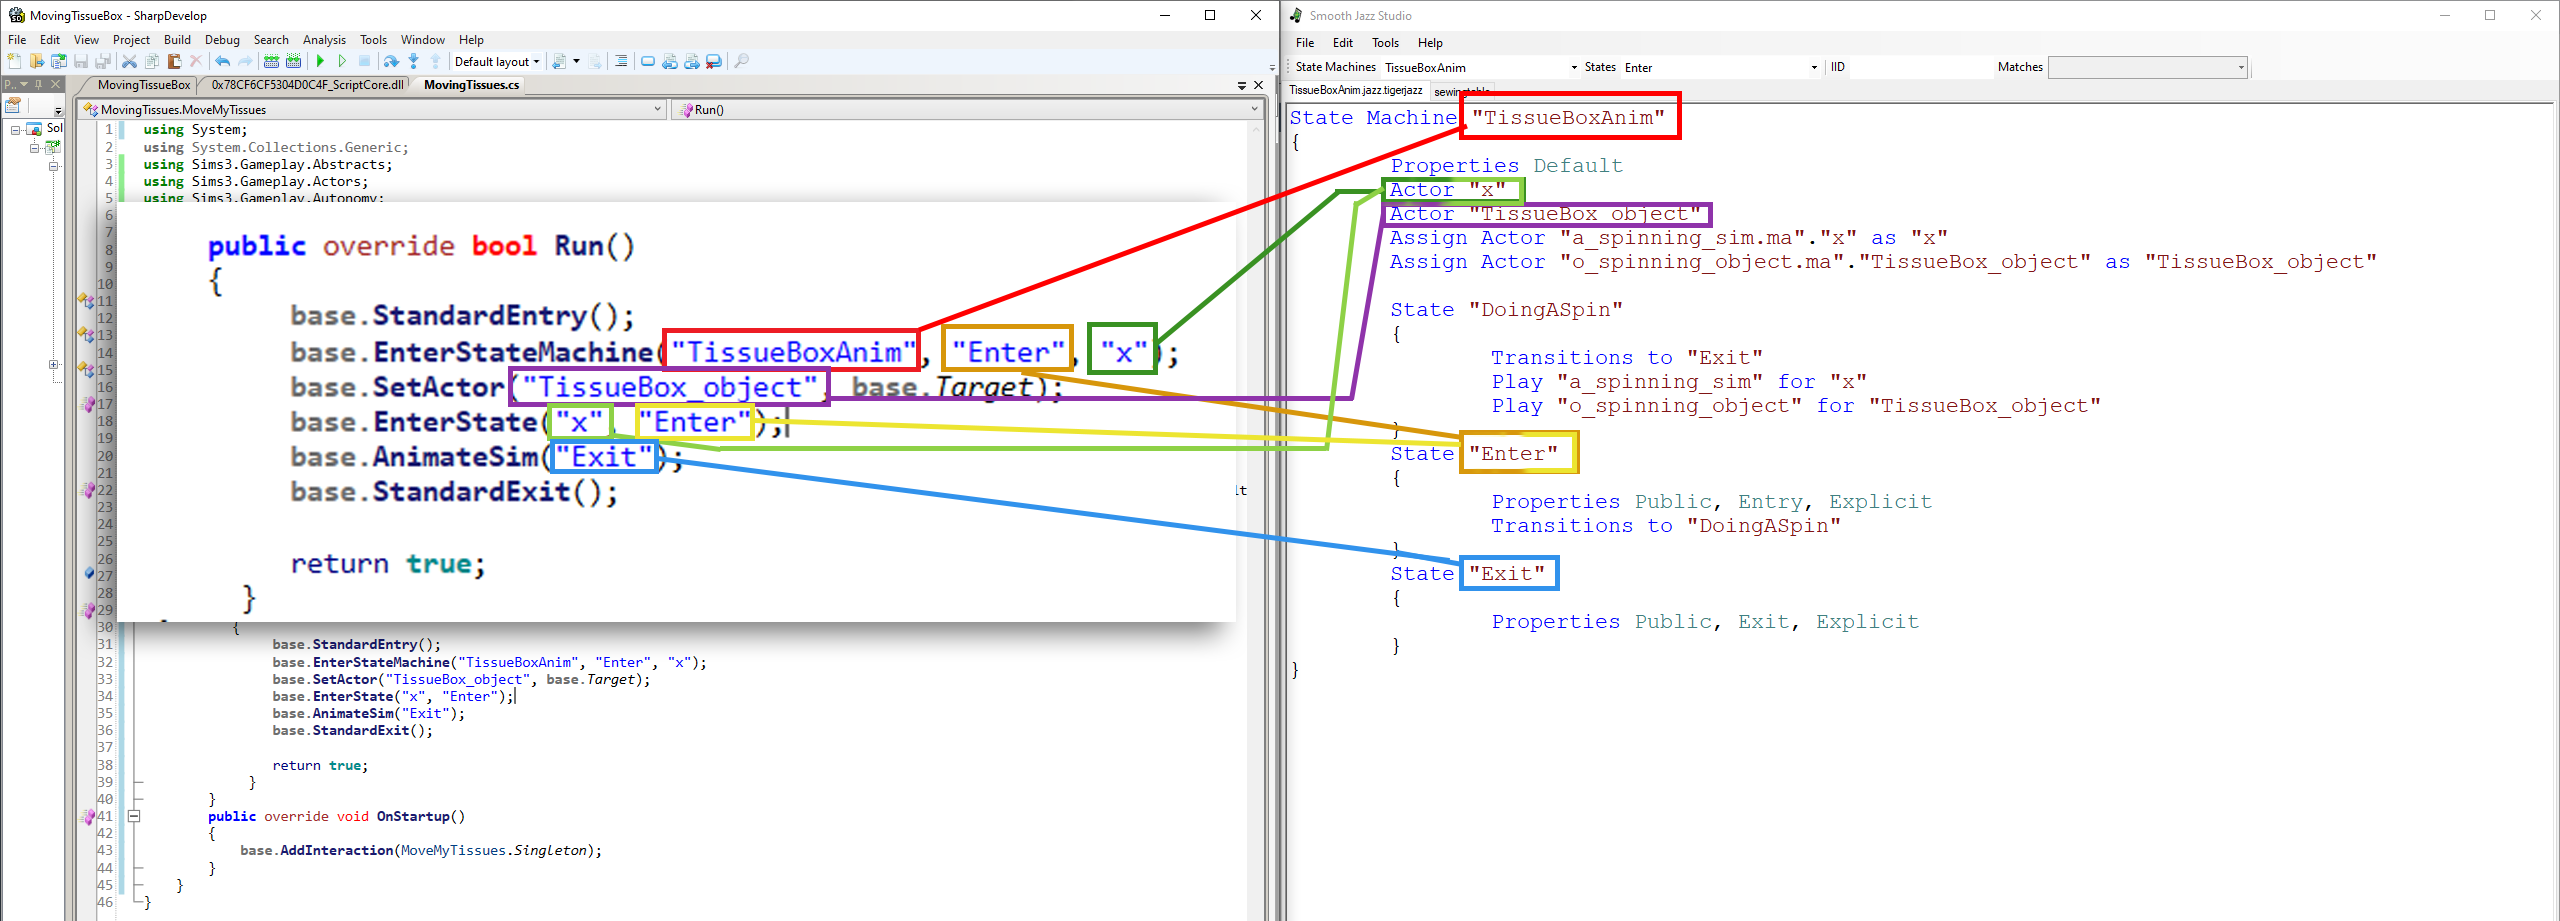
Let's get to the even more unknown bits of jazz scripts! So, as it stands, you've got your notepad with copied values, right? Mine looks like this:
    base.EnterStateMachine("TissueBoxAnim", "Enter", "x");
    base.SetActor("TissueBox_object", base.Target);
The reason for this being important is because we need to be precise here when doing jazz scripts. A spelling mistake, capitals where they shouldn't be, etc can break the Jazz script horribly!
Let's get into SmoothJazz!
- Open the SmoothJazz I asked you to download. Make sure that yours is not the one you got off MTS. That one won't work with the current patch version for the game, the simology one I linked does, however! (learned this the hard way :p)
- Go to File > New
Now you should be able to type! :) All you need to do now is copy-paste this and change it to your namings:
    State Machine "StateMachineNameHere"

    {

        Properties Default

        Actor "x"

        Actor "SecondActorHere"

        Assign Actor "CLIPNameHere.ma"."x" as "x"

        Assign Actor "CLIPNameHere.ma"."SecondActorHere" as "SecondActorHere"


        State "YourCustomStateName"

        {

            Transitions to "Exit"

            Play "CLIPNameHere" for "x"

            Play "CLIPNameHere" for "SecondActorHere" //OPTIONAL!!

        }

        State "Enter"

        {

            Properties Public, Entry, Explicit

            Transitions to "YourCustomStateName"

        }

        State "Exit"

        {

            Properties Public, Exit, Explicit

        }

    }
For a simple Jazz script, this is literally all you need! If you're looking for the loop stuff, see the bottom of this post ;)
What is what?
- State Machine "StateMachineNameHere" : Here we want to add "TissueBoxAnim". See how in my base.EnterStateMachine("TissueBoxAnim", "Enter", "x"); I have 'TissueBoxAnim'? That's the State machine name! :)
- Actor "X" : Because in our base.EnterStateMachine("TissueBoxAnim", "Enter", "x"); in the C# script, we assigned an "x" at the end (Aka the sim! ;)), We always start with this one.
- Actor "SecondActorHere" : Remember this line in our C# script: base.SetActor("TissueBox_object", base.Target);? TissueBox_object is our second actor! Which means we now have: Actor "TissueBox_object"
NOTE ABOUT ACTORS: You can add as many actors to the list as you want! As long as it meets up with the 'SetActor' function in your C# :)
- Assign Actor "CLIPNameHere.ma"."x" as "x" : Here we assign our CLIPname to the actor that belongs to it :) The CLIPname of the animation I made for my sim is "a_spinning_sim". The first 'x' means the in-file(CLIP) name of the actor, the 'as x' is our jazz script actor's name :)
- Assign Actor "CLIPNameHere.ma"."SecondActorHere" as "SecondActorHere": Same as the 'x', but in my case this will become Assign Actor "o_spinning_object.ma"."TissueBox_object" as "TissueBox_object"
- Play: Now we actually put in our proper Clipname WITHOUT the .ma!! so, "o_spinning_object" for example :) Then, we assign which actor it's meant for.
NOTE ABOUT ASSIGN CLIPS TO ACTORS:
Because CLIP files are basically an archive, the actual file inside of a CLIP file always has YourCLIPName.ma rather than just 'YourClipName'.
:alarm: IMPORTANT: You ALWAYS need a "State "Exit" And "State "Enter"! Without these, the C#, as well as the Jazz script, will break! You ESPECIALLY need the 'properties', just so that the jazz script won't catch fire. You also ALWAYS should have a custom third state that will run the animation for you during that state, hence why it's included in the reference! :) Those are the minimum requirements of course. If you want to add 5 more custom states, go for it! :)
State Enter and State Exit are also part of the "base.StandardEntry()" and "base.StandardExit()" function inside our C# code. So this really needs to be included.
What my code looks like now:
    State Machine "TissueBoxAnim"

    {

        Properties Default

        Actor "x"

        Actor "TissueBox_object"

        Assign Actor "a_spinning_sim.ma"."x" as "x"

        Assign Actor "o_spinning_object.ma"."TissueBox_object" as "TissueBox_object"


        State "DoingASpin"

        {

            Transitions to "Exit"

            Play "a_spinning_sim" for "x"

            Play "o_spinning_object" for "TissueBox_object"

        }

        State "Enter"

        {

            Properties Public, Entry, Explicit

            Transitions to "DoingASpin"

        }

        State "Exit"

        {

            Properties Public, Exit, Explicit

        }

    }
Save!:
I usually do this in 2 steps:
1. File > Save.
2. Give it any name. I'll call mine 'TissueboxJazz'
3. File > Package into
4. keep the naming that SmoothJazz gives you.
5. Save into a folder you can find back :p We'll put the jazz stuff in later (See S3PE stuff).
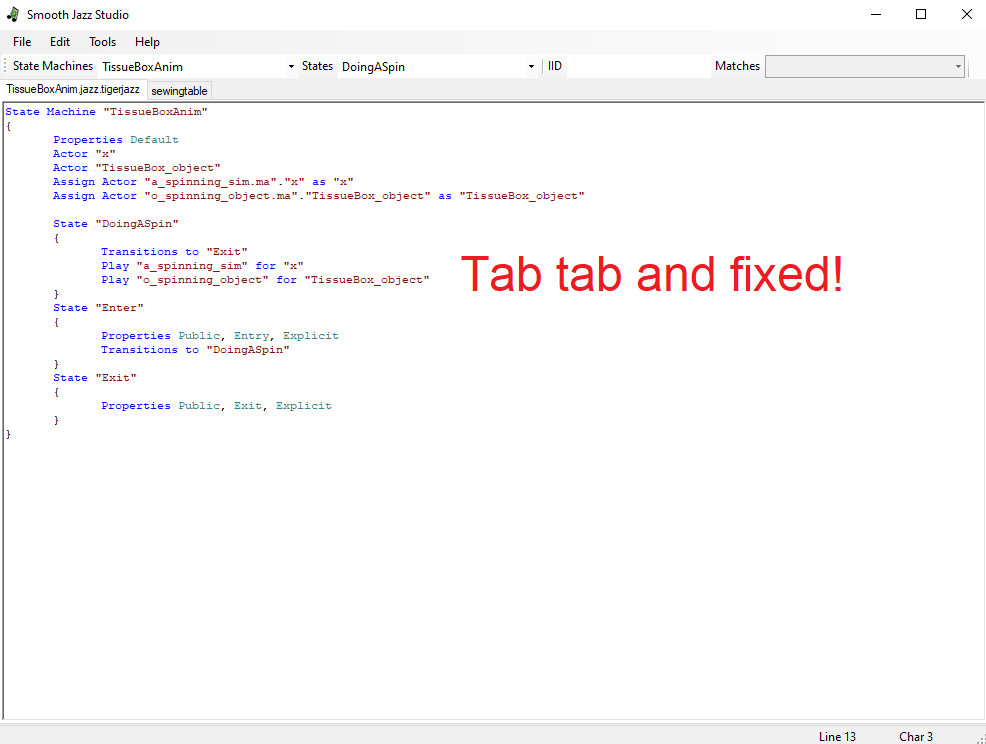
"I got a "Parser doesn't recognise literal" error, what do I do?"
SmoothJazz seems to have a hate for spaces. So ALWAYS use tab. To fix this here's an easy picture tutorial to see what you can try:
1. Highlight the bit I highlighted. Also check if you're on the right line here!
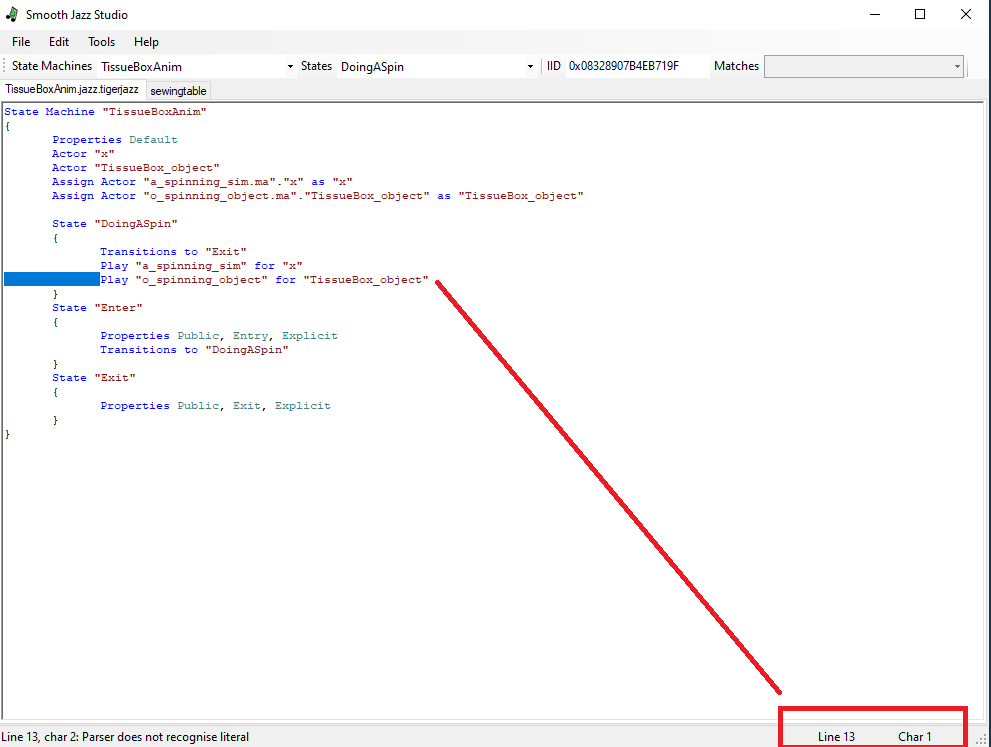
2. Delete the entire highlighted area
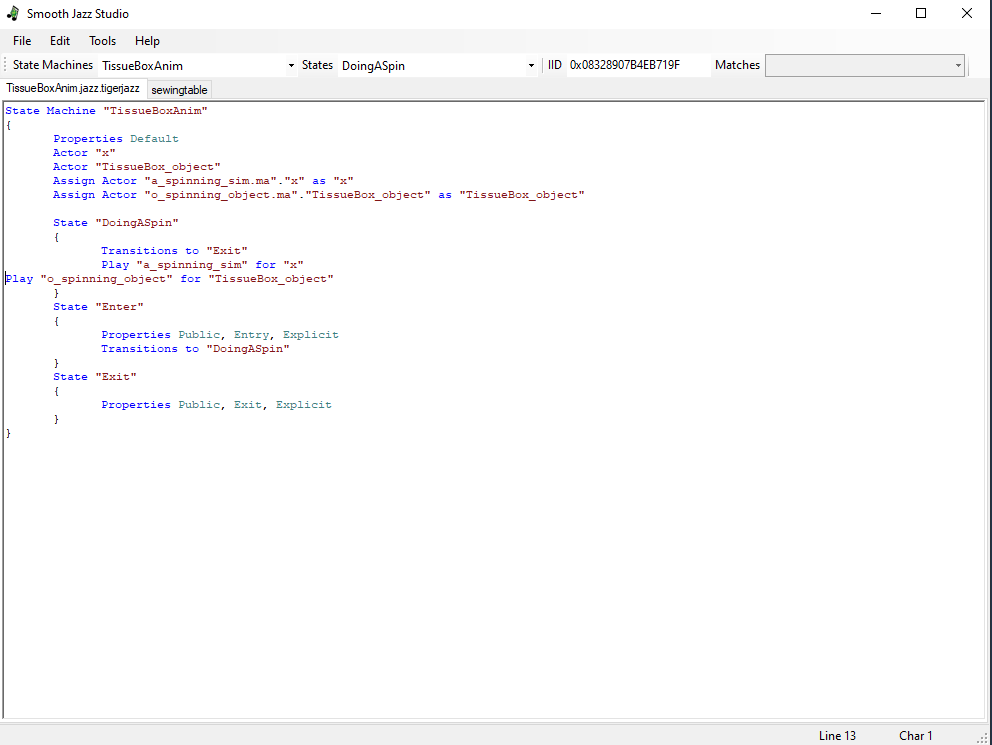
3. Tab twice (in my case) and voila! Error fixed! :D
If you're experiencing any other errors, do let me know in the comments!
An Illustration of what links to what:
Somewhat more advanced stuff for SmoothJazz:
http://www.simlogical.com/ContentUp...e/uploads/1240/
Some edge cases:
LOOPING WITH JUST ONE STATE/ANIMATION - JAZZ SCRIPT:
Looping can actually well be done with only one state.
NOTE: Make sure that in your C# Script you have a "base.AnimateSim("Loop");", Else it won't reach the Loop state in the Jazz script ever!
    State Machine "TissueBoxAnim"

    {

        Properties Default

        Actor "x"

        Actor "TissueBox_object"

        Assign Actor "a_spinning_sim.ma"."x" as "x"

        Assign Actor "o_spinning_object.ma"."TissueBox_object" as "TissueBox_object"


        State "DoingASpin"

        {

            Transitions to "Exit"

            Play "a_spinning_sim" for "x"

              Play "o_spinning_object" for "TissueBox_object"

        }

        State "Loop"

        {

           Properties Public, Loop, Explicit

           Transitions to "DoingASpin"

           Transitions to "Exit"

            Select Random

            {

                Weight 1

                {

                    Next State "DoingASpin"

                }

            }

        }

        State "Enter"

        {

            Properties Public, Entry, Explicit

            Transitions to "DoingASpin"

        }

        State "Exit"

        {

            Properties Public, Exit, Explicit

        }

    }
LOOPING WITH JUST MULTIPLE STATES/ANIMATION - JAZZ SCRIPT:
Here's an example with how I did it for my Sewing table :)
NOTE: Make sure that in your C# Script you have a "base.AnimateSim("Loop");", Else it won't reach the Loop state in the Jazz script ever!
    State Machine "sewingtable"

    {

        Properties Default

        Actor "x"

        Actor "sewingtable_table"

        Actor "chairDining"

        Actor "fabric"

        Assign Actor "a2o_sewing_turnOn.ma"."x" as "x"

        Assign Actor "a2o_sewing_start.ma"."x" as "x"

        Assign Actor "a2o_sewing_middle.ma"."x" as "x"

        Assign Actor "a2o_sewing_exit.ma"."x" as "x"

        Assign Actor "a2o_sewing_Loop1.ma"."x" as "x"

        Assign Actor "a2o_sewing_Loop2.ma"."x" as "x"

        Assign Actor "o_sewing_loop_1.ma"."fabric" as "fabric"

        State "a2o_SewingTable_StartMachine"

        {

            Transitions to "a2o_SewingTable_Start"

            Play 0x6008783968663930 for "x"

        }

        State "a2o_SewingTable_Start"

        {

            Transitions to "Loop"

            Play "a2o_sewing_start" for "x"

        }

        // Starting assigning the states with the loops we want

        State "SewingTable_Firstloop"

        {

            Transitions to "Loop"

            Play "a2o_sewing_middle" for "x"

            Play "o_sewing_loop_1" for "fabric"

        }

        State "SewingTable_Secondloop"

        {

            Transitions to "Loop"

            Play "a2o_sewing_Loop1" for "x"

            Play "o_sewing_loop_1" for "fabric"

        }

        State "SewingTable_ThirdLoop"

        {

            Transitions to "Loop"

            Play "a2o_sewing_Loop2" for "x"

            Play "o_sewing_loop_1" for "fabric"

        }

        State "a2o_SewingTable_stop"

        {

            Transitions to "Exit"

            Play "a2o_sewing_exit" for "x"

        }

        State "Enter"

        {

            Properties Public, Entry, Explicit

            Transitions to "a2o_SewingTable_StartMachine"

        }

        State "Exit"

        {

            Properties Public, Exit, Explicit

        }

        State "Loop"

        {

            Properties Public, Loop, Explicit

            Transitions to "SewingTable_Firstloop"

            Transitions to "SewingTable_Secondloop"

            Transitions to "SewingTable_middleloop"

            Transitions to "a2o_SewingTable_stop"

            Select Random

            {

                Weight 1

                {

                    Next State "SewingTable_Firstloop"

                }

                Weight 2

                {

                    Next State "SewingTable_Secondloop"

                }

                Weight 3

                {

                    Next State "SewingTable_middleloop"

                }

            }

        }

    }
Let's set everything up with S3PE!
- Open up the object package you cloned for this tutorial. IN my case that's the TissueBox package :)
- Go to Resources > Import > From package
- Go to the folder you saved the Jazz package with SmoothJazz. In my case it's called 'TissueBoxAnim.jazz.tigerjazz'
4, Import and voila! You should now see a JAZZ entry in your S3PE! :)
The preview here is important. If it gives an "error cannot read resource' error, then it might just be that you have the wrong smoothjazz version.

If it looks like the picture above, then you did it!
- Import your CLIP files! (If unsure how to do this, go to: https://www.youtube.com/watch?v=LGK...6Rxm-KT&index=3 )
- Resource > Add
- Type will be your S3SA, Group 0x0, Instance I just put this in the name input field: Sims3.Gameplay.Objects.Lyralei.MovingTissues and pressed FNV64.
- Click ok!
- Right click the OBJK resource > Edit OBJK
- In the script field, put in your C# script namespace + the class. In my case it will be: Sims3.Gameplay.Objects.Lyralei.MovingTissues
- Save! And Then Save the package! :)
- Done! Lets play it in-game! :)
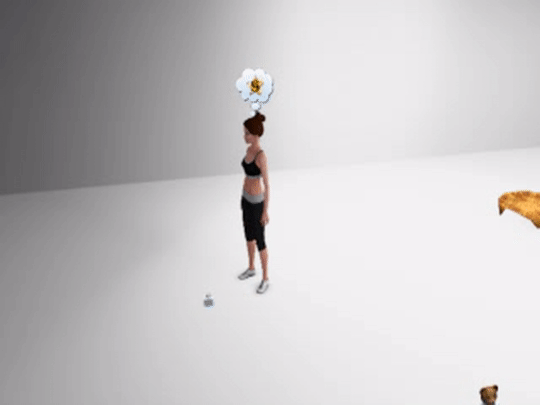
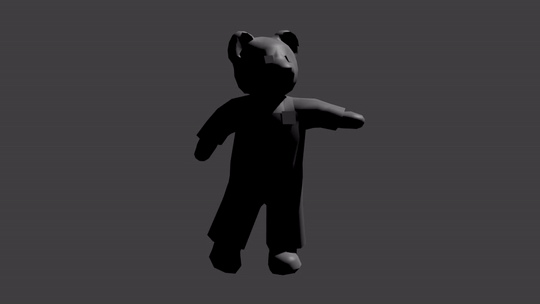
This is what mine does! So hopefully yours works too! (It surprisingly loops well as a gif lol)
Wanna make a dancing teddy like this one? (Yes, this is actually the in-game teddy bear! No, it's not up for download :/)
Then you're at the right address! ;)
Animating objects is actually incredibly easy! It's just that we have to don't have any tutorials out there who tell us how its done. So i'm changing that here and right now! :p
What you need:
- Blender
- Cliptool:
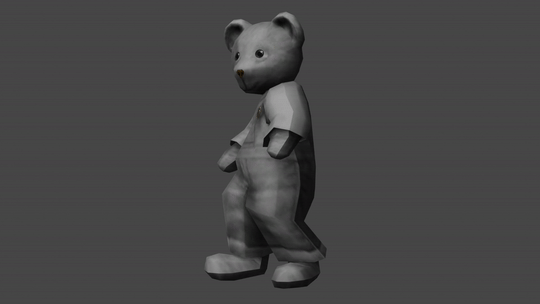
- Any cloned object's package. I'll be using the teddy bear, which I cloned with S3OC :)
Let's get started!
- Open blender
- Delete the infamous cube :p
- Go to Scene > Load prop
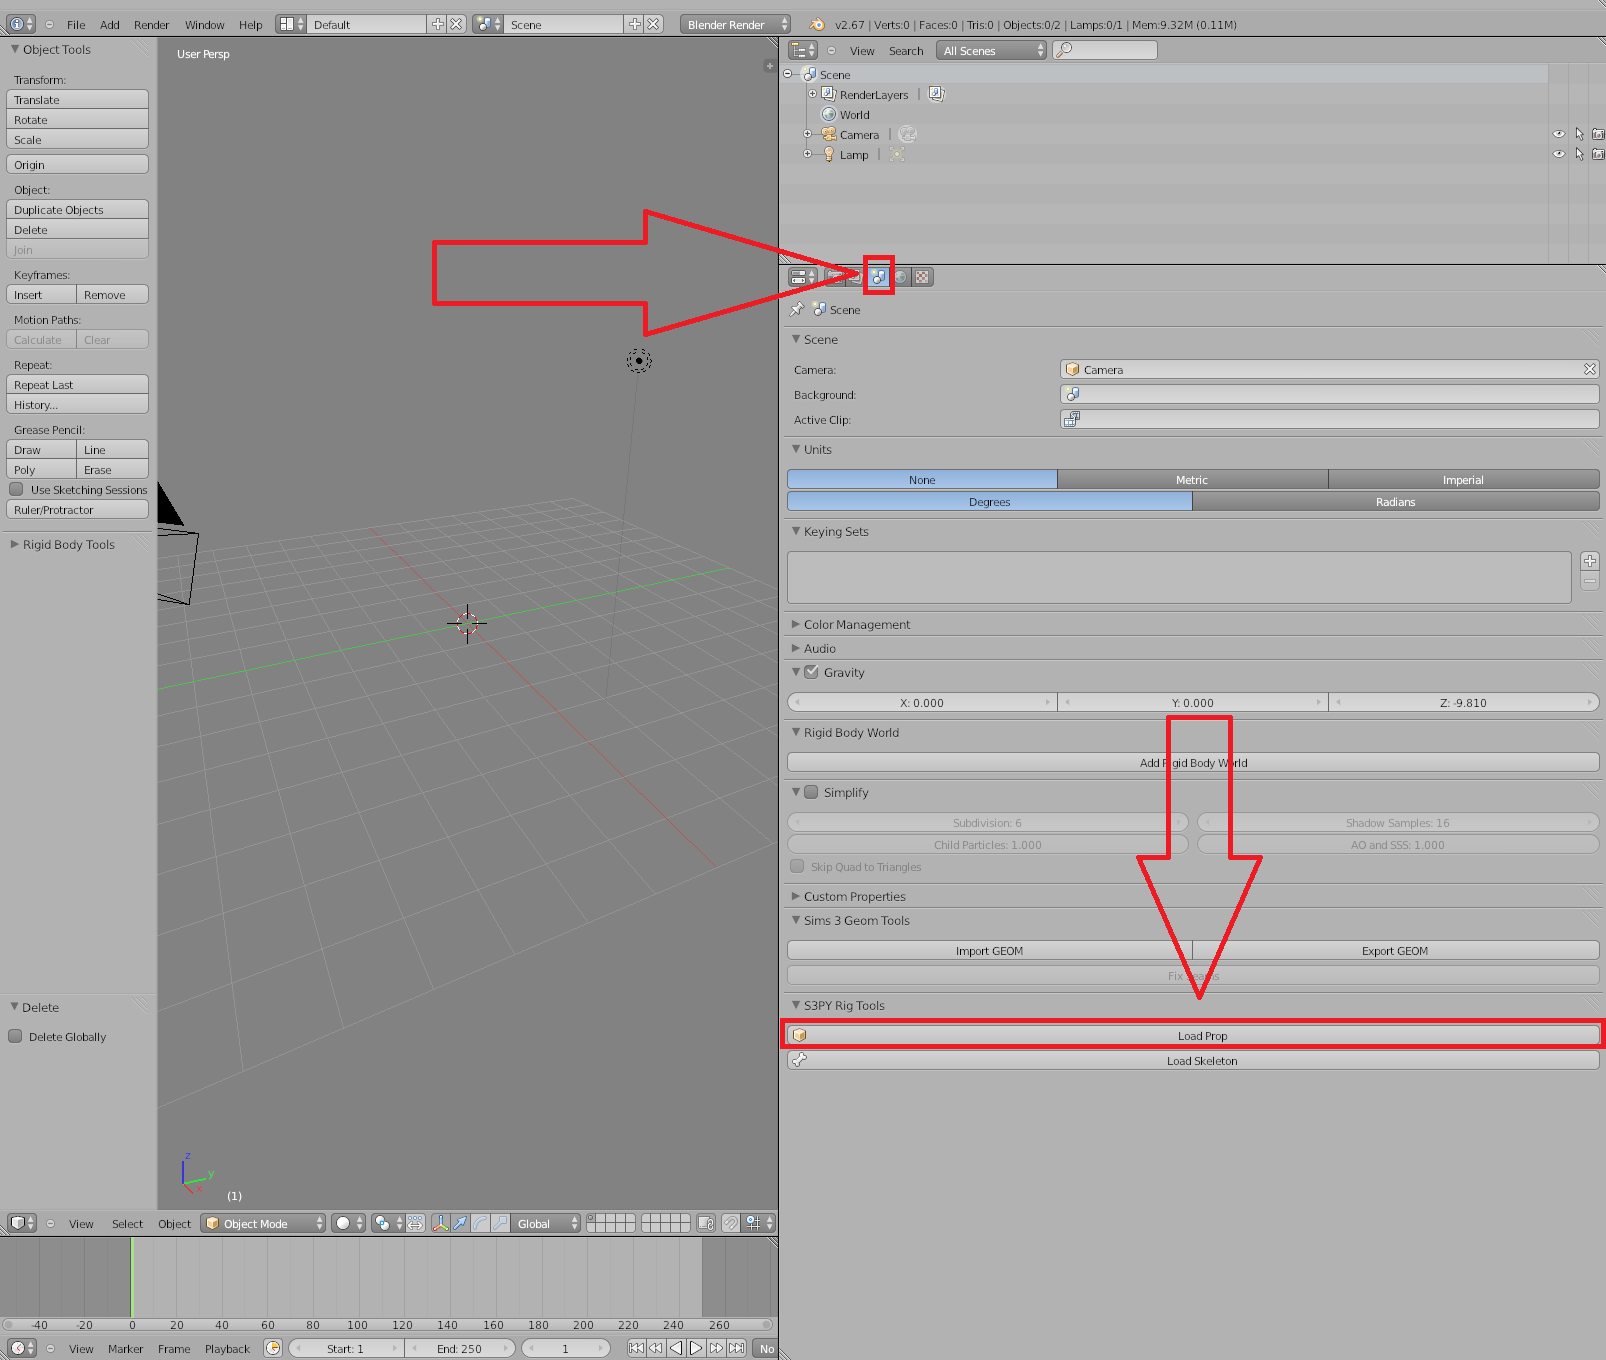
- Select the cloned package object you extracted. For me that's the teddy ;)
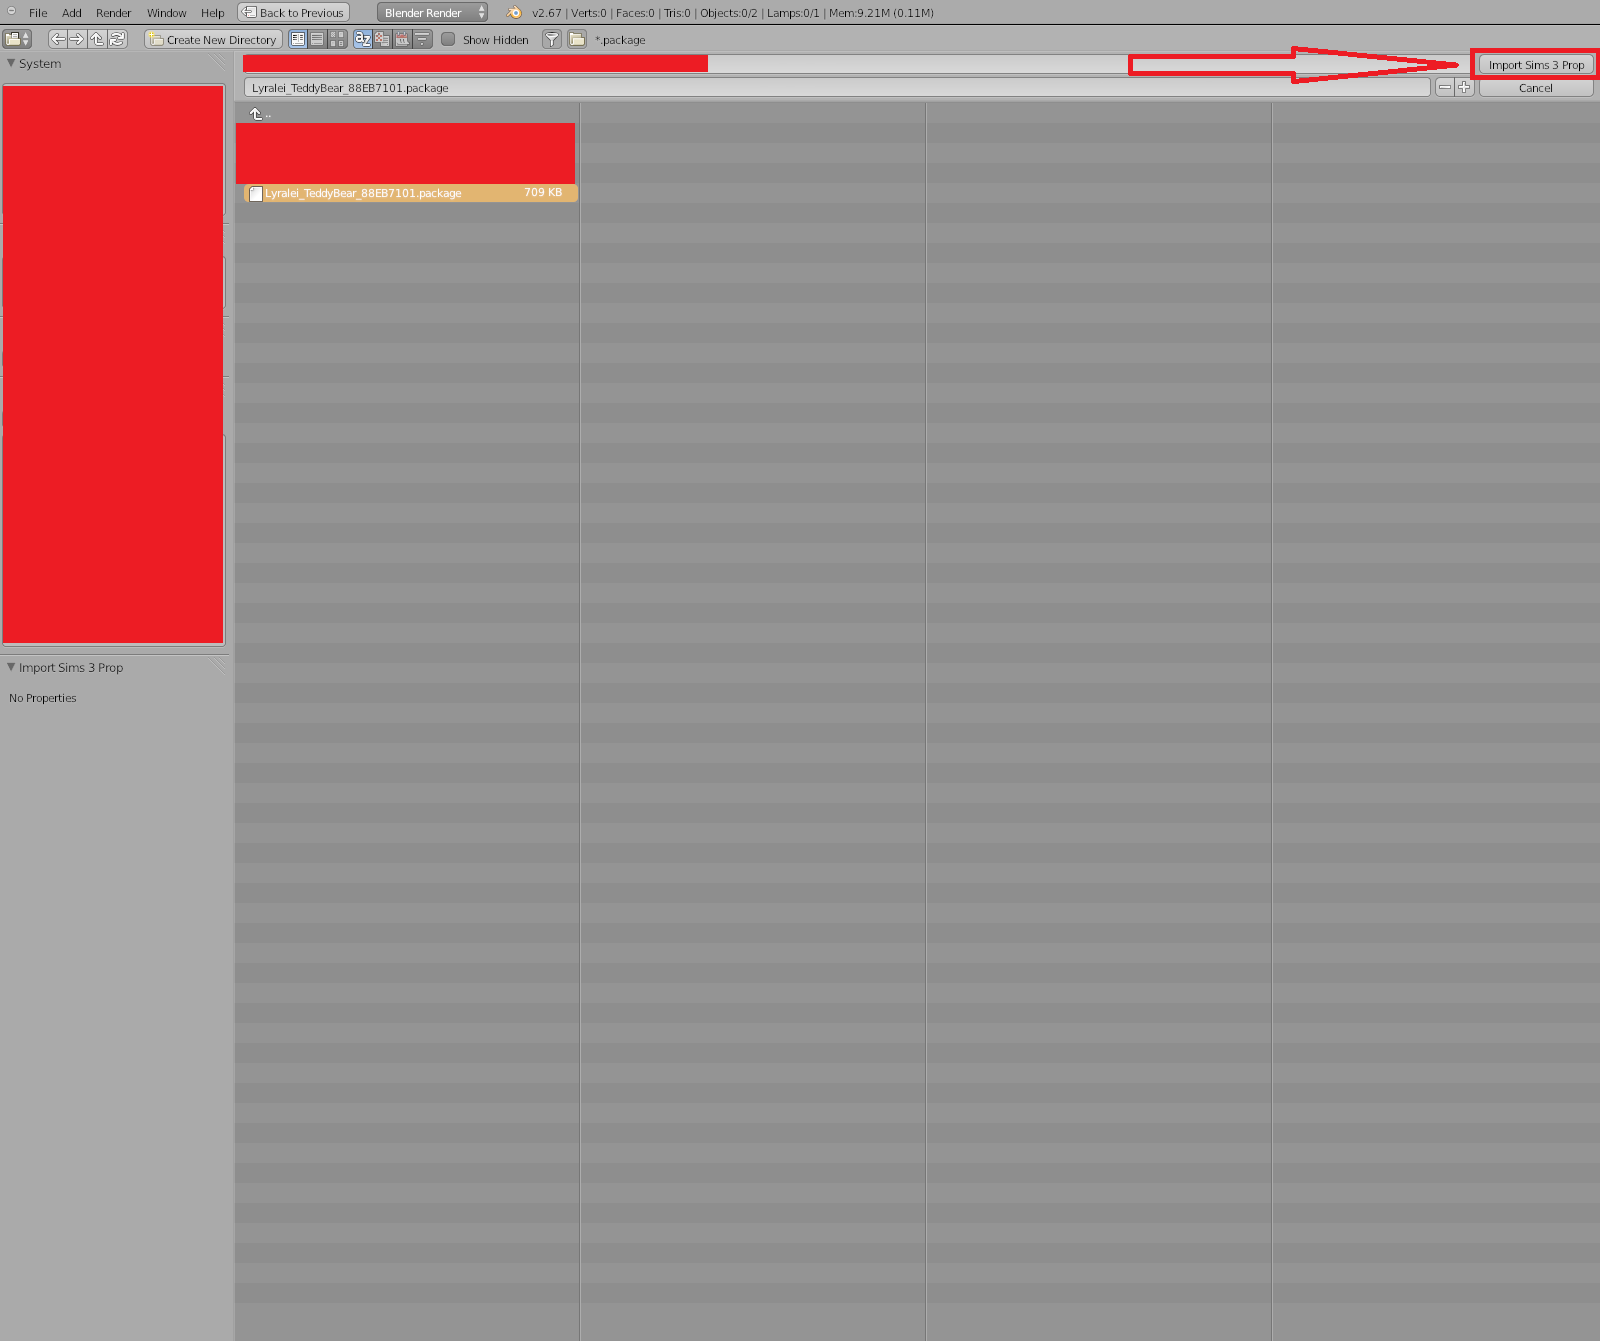
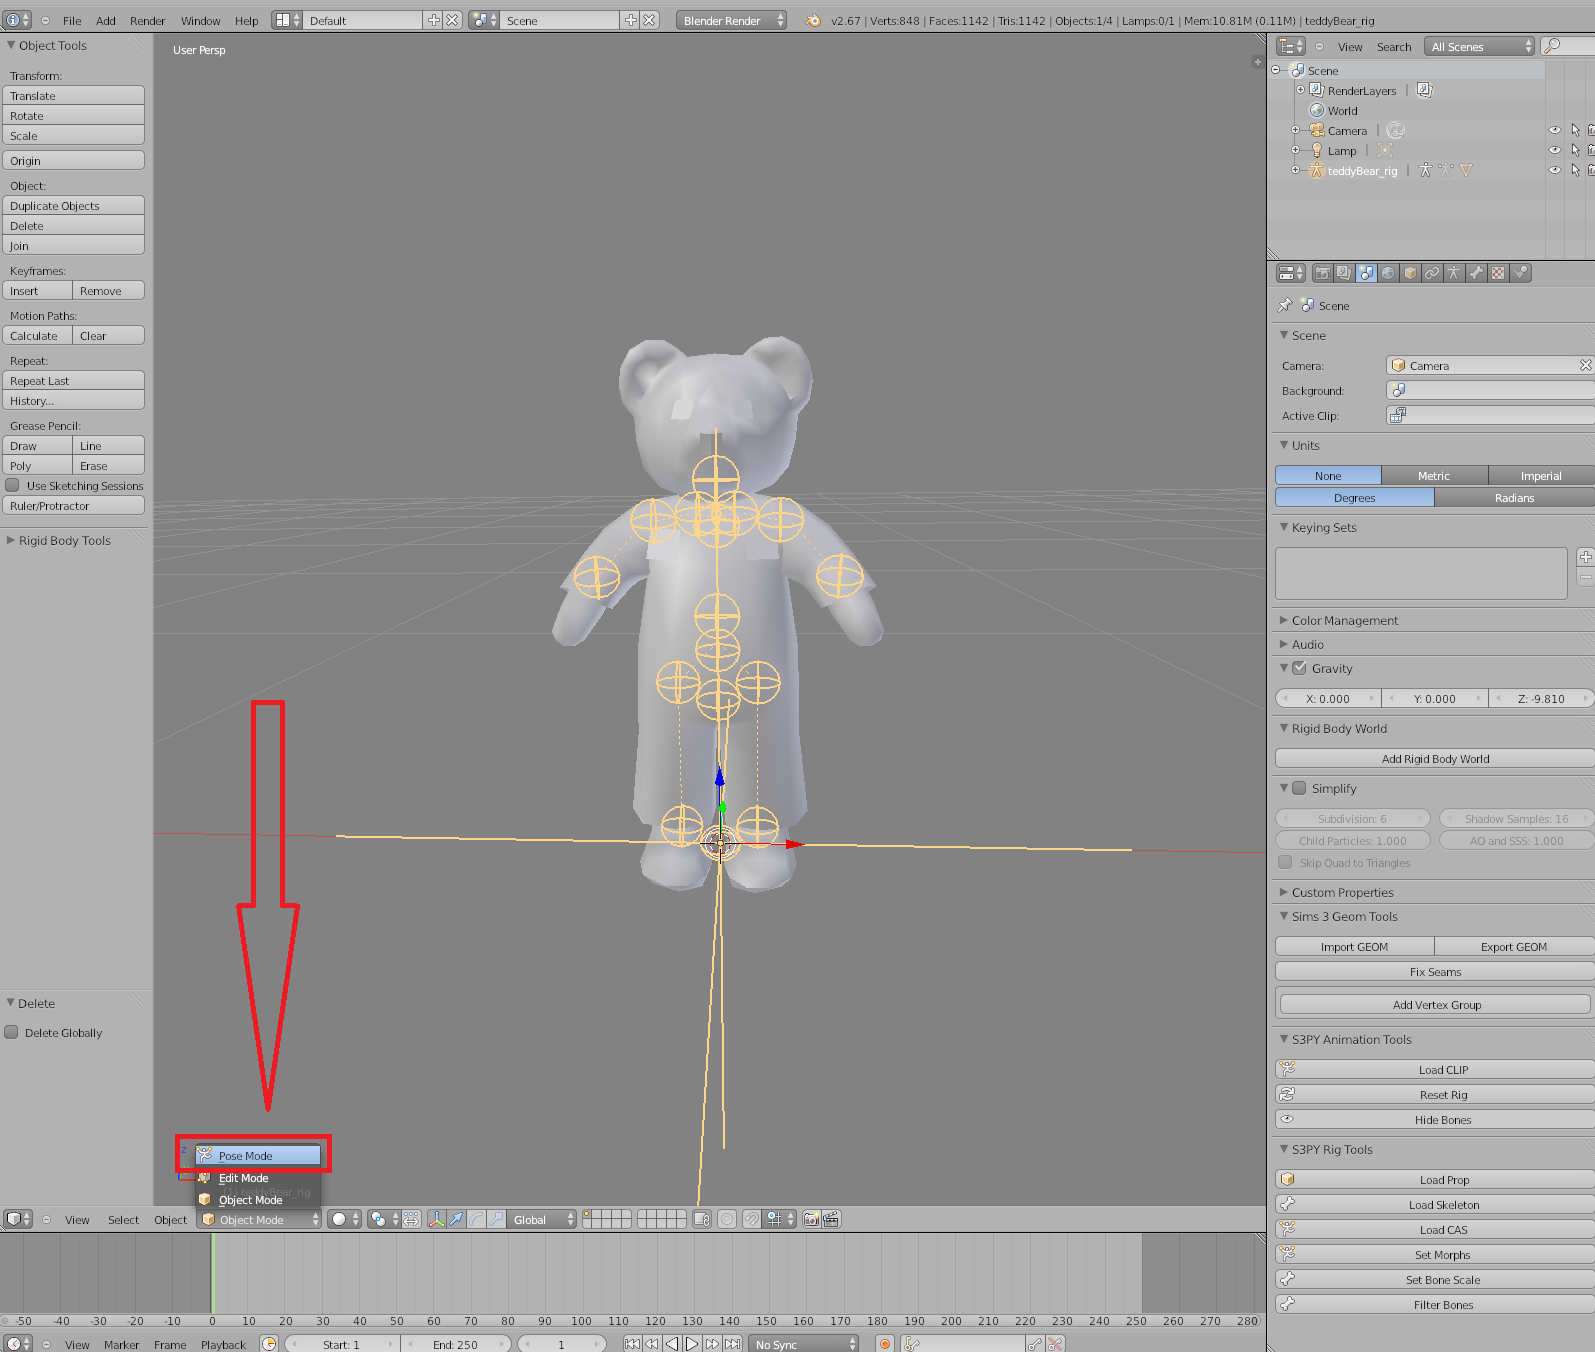
Hopefully now you should see your own object! :)

- Get into pose mode. Make sure you're selecting the rig and not the teddy mesh! This can be a tricky one, but you can do it! :)
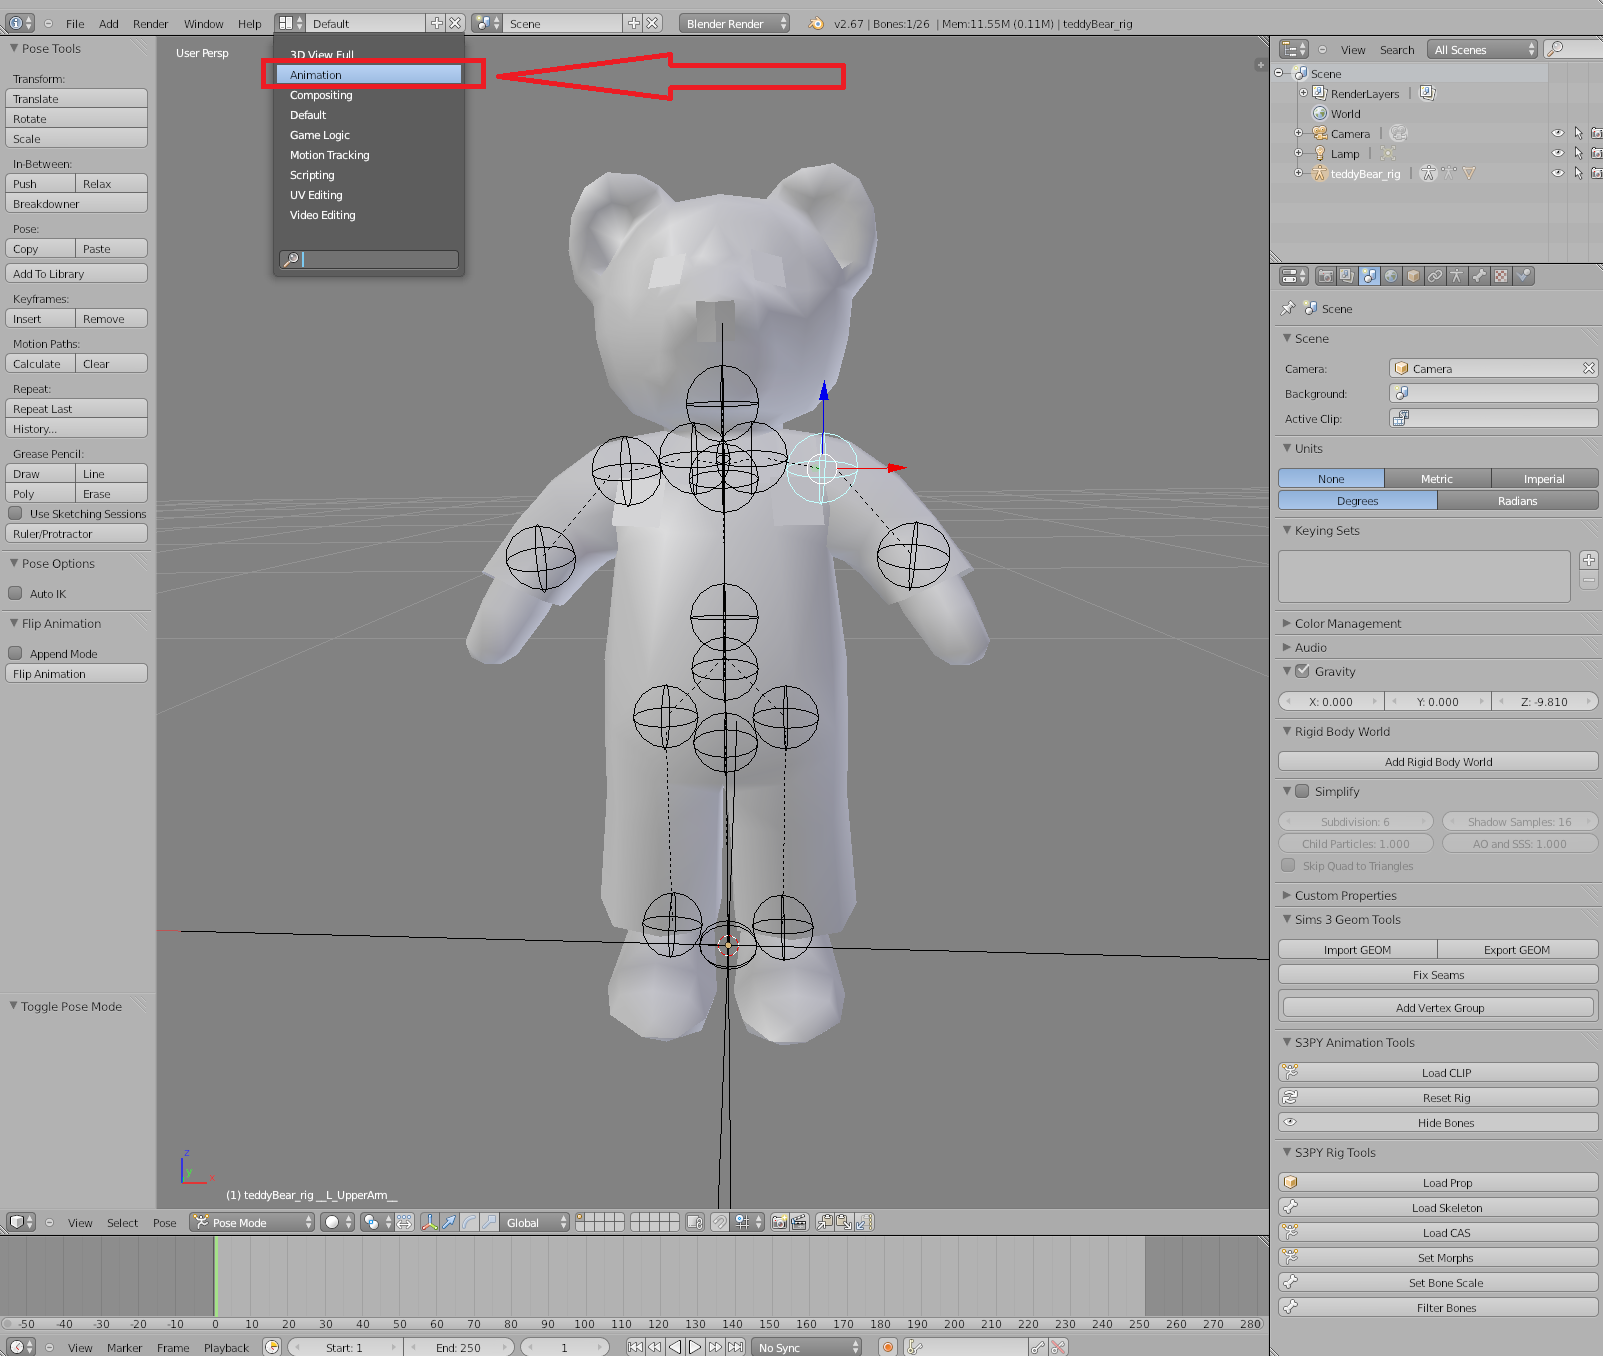
- Click on the button next to default and select 'animation'
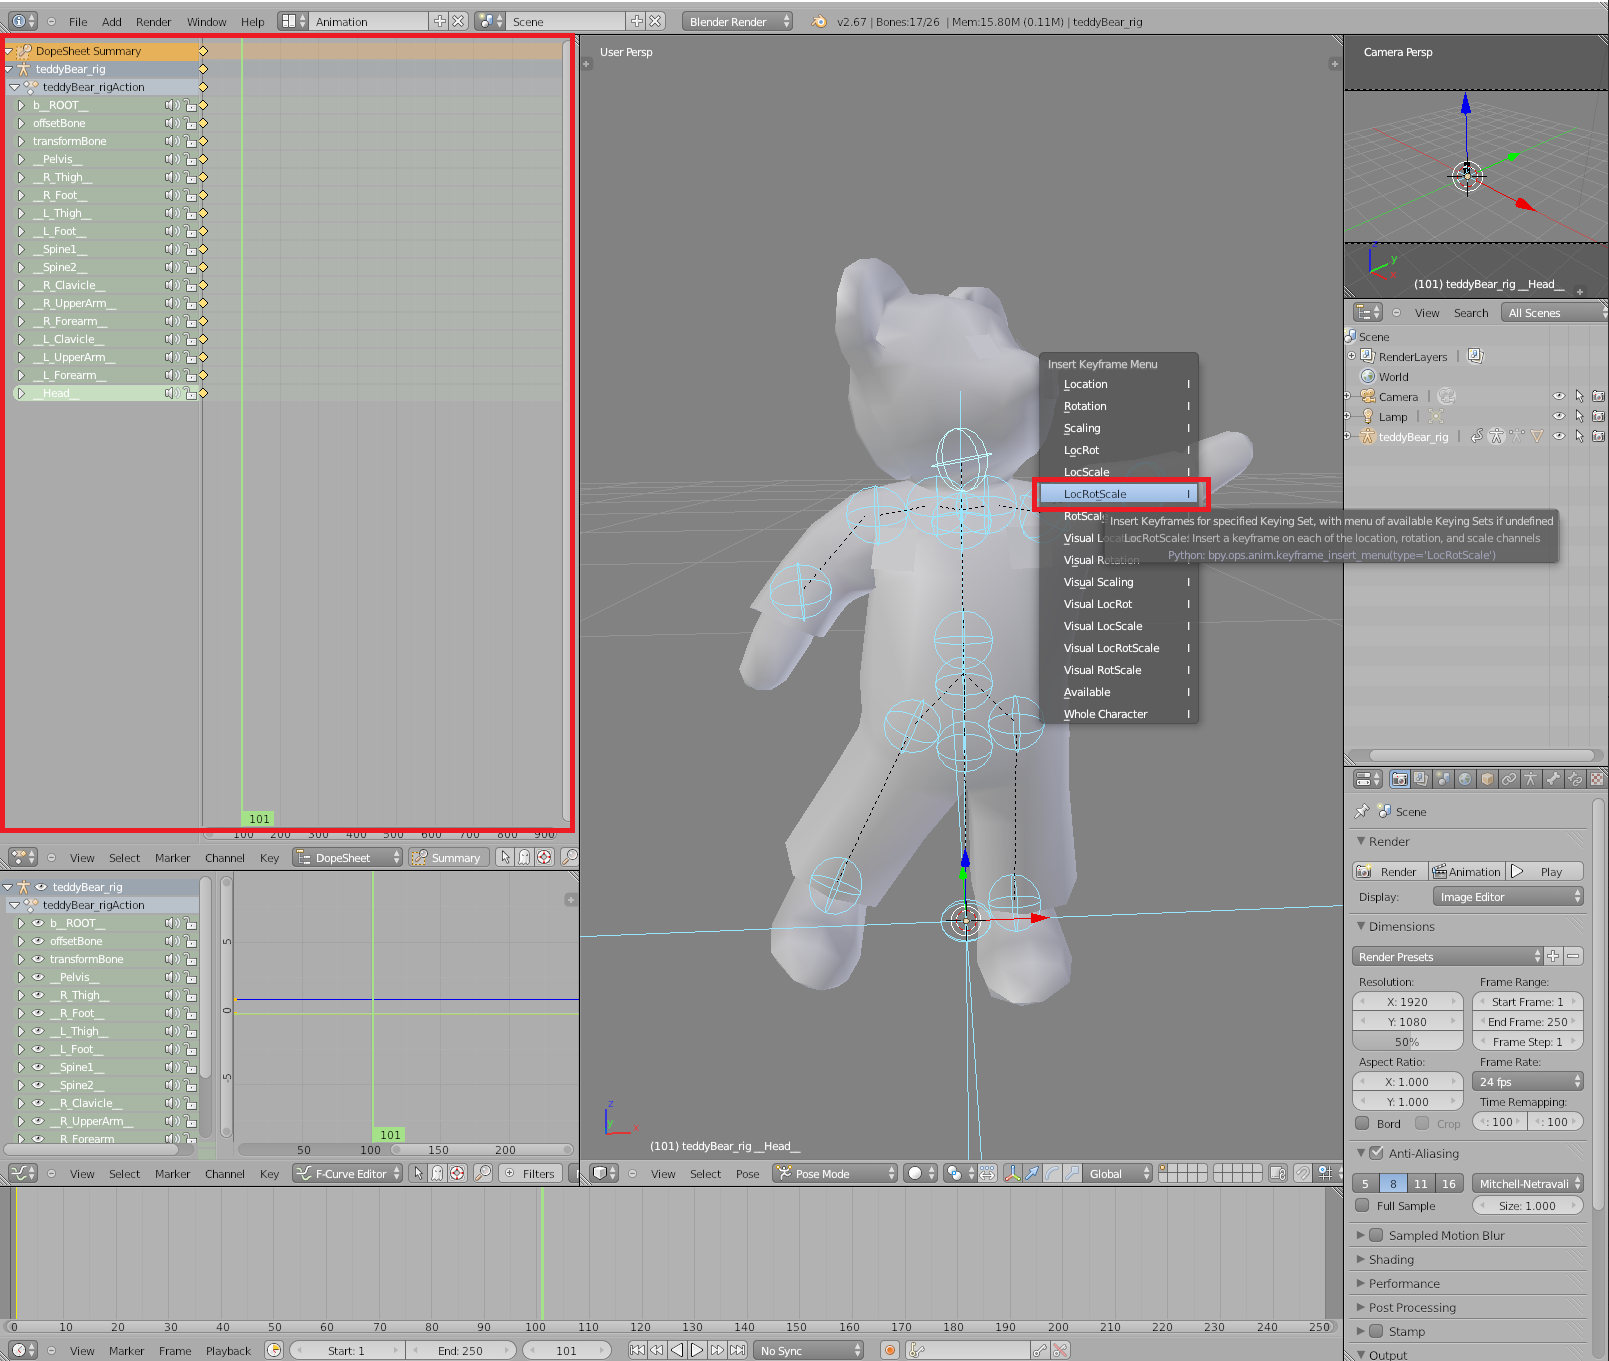
- OPTIONAL but for any looping animation it's always good to use the shortcut 'i' > LocRotScale.

- Let's start animating!
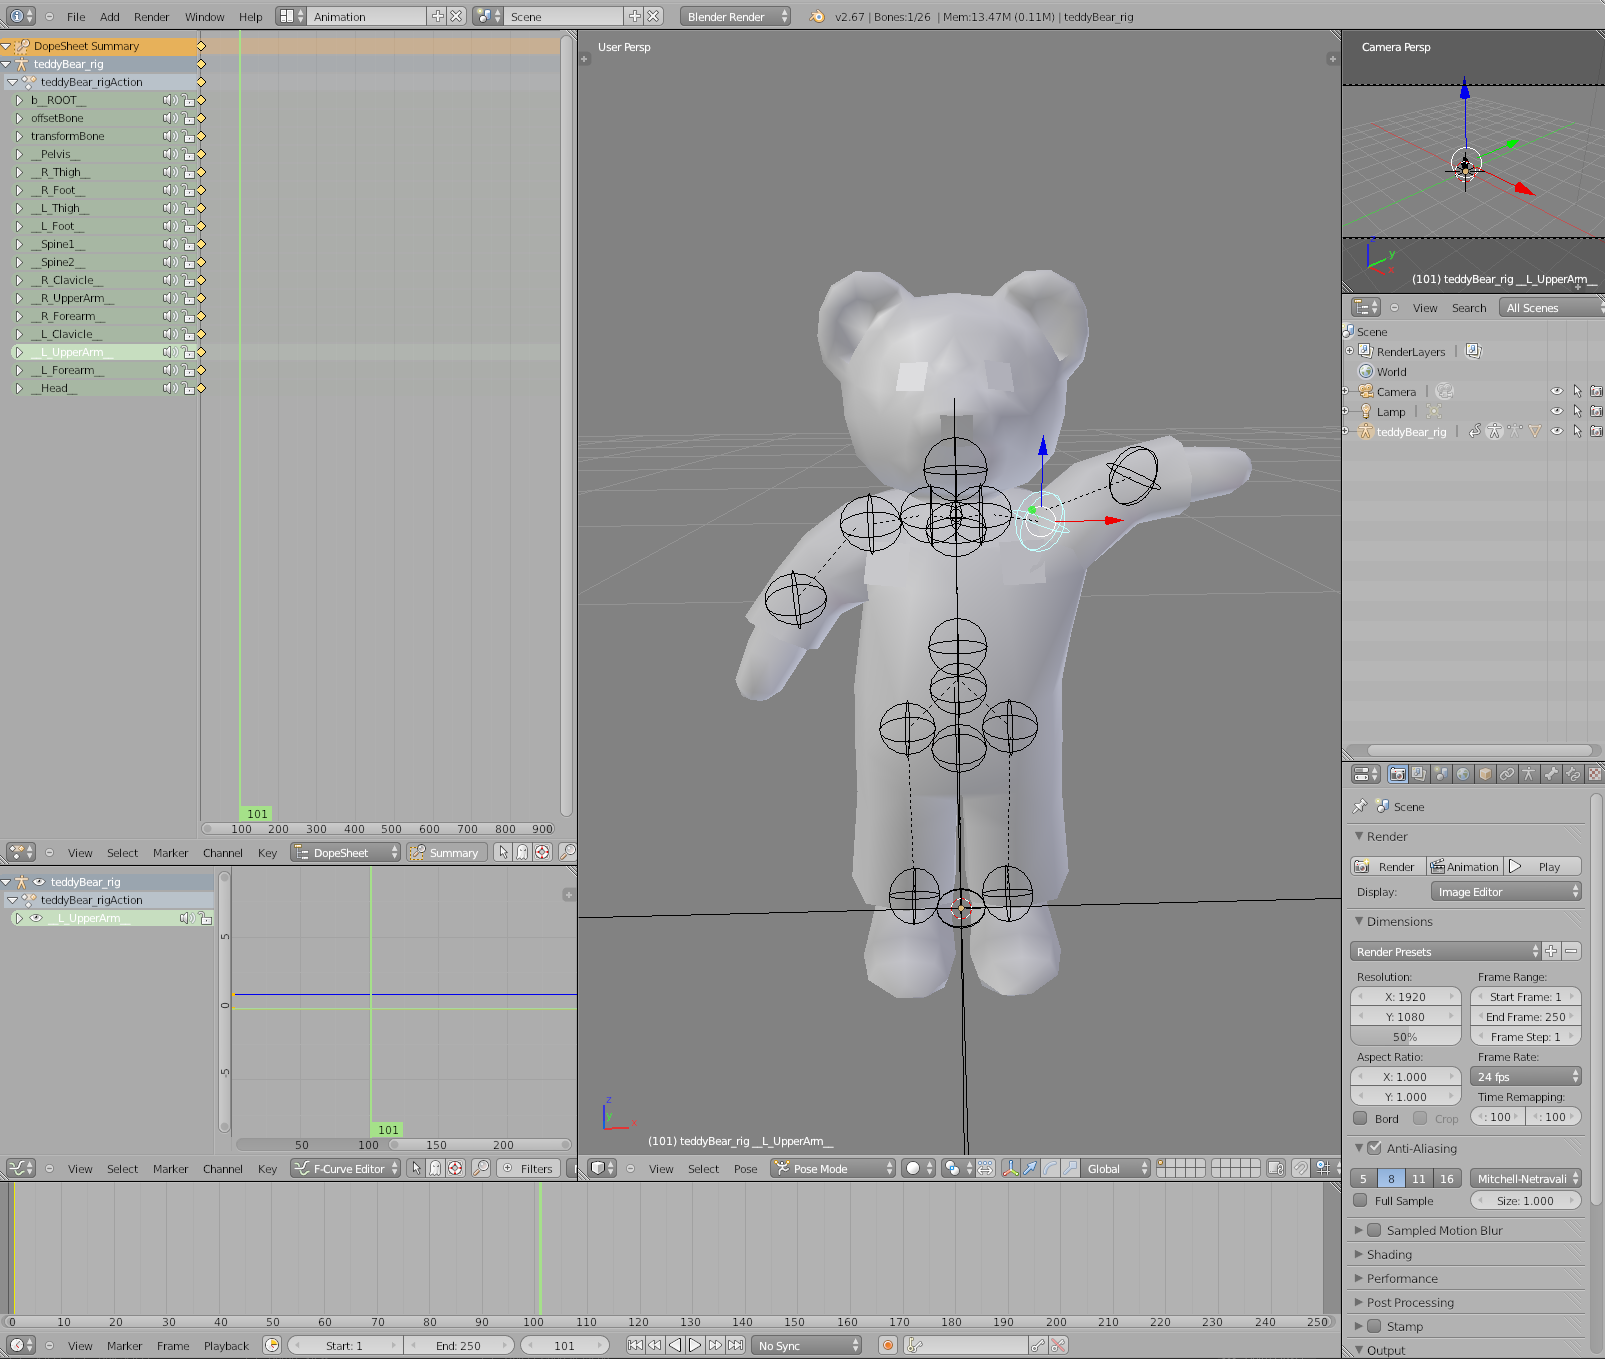
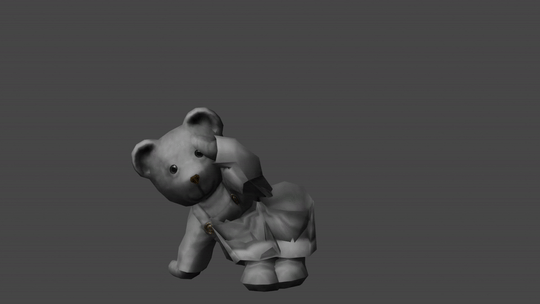
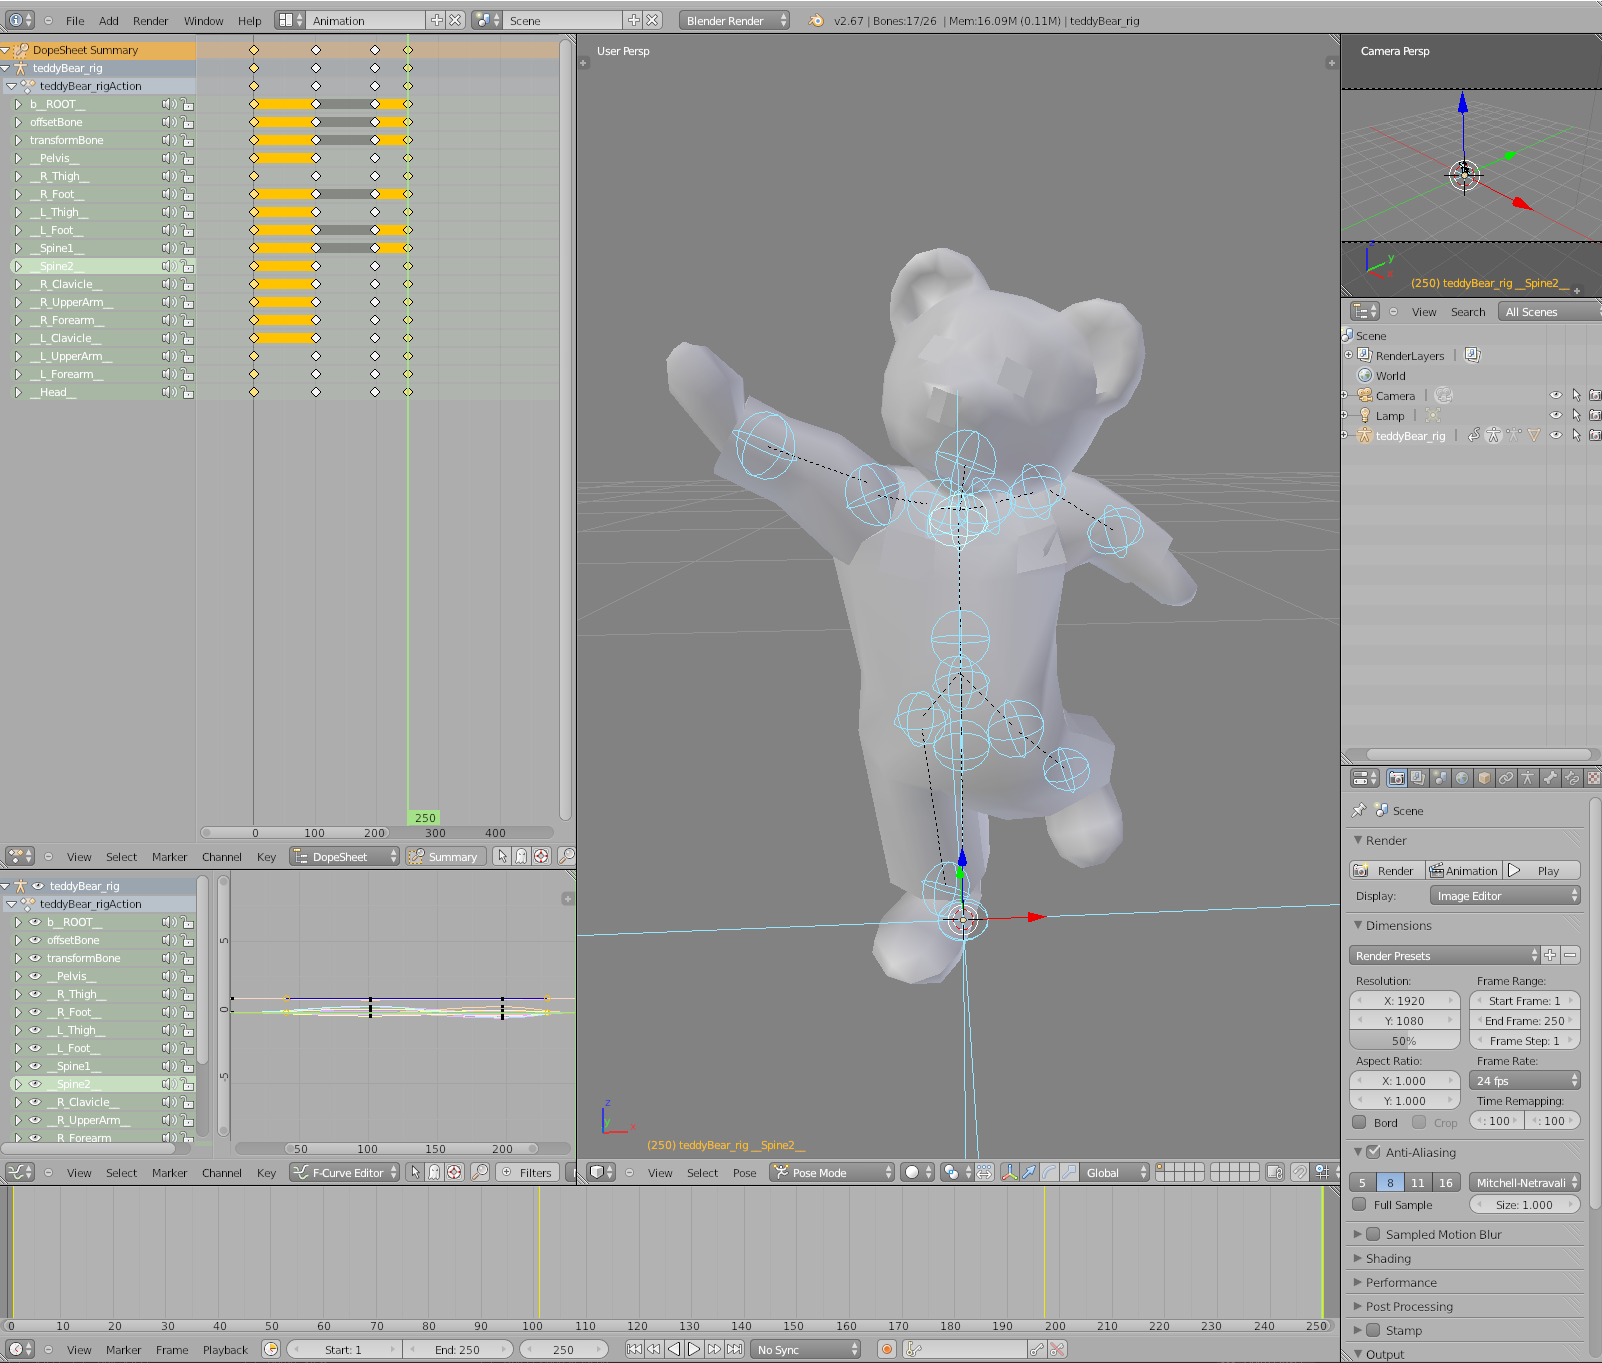
- When saving a second 'keyframe', or in this case, section of the animation you're working on, make sure you have the GREEN line thingy with 101 underneath it (for me that is, for you it's probably something else) is away from the yellow dots. Else you will override your previous one! Or just make a static pose! After that, you can do the shortcut i > LocRotScale
- You should have something like this now! See how the yellow dots are apart from each other? if you play your animation now, the teddy will move :)
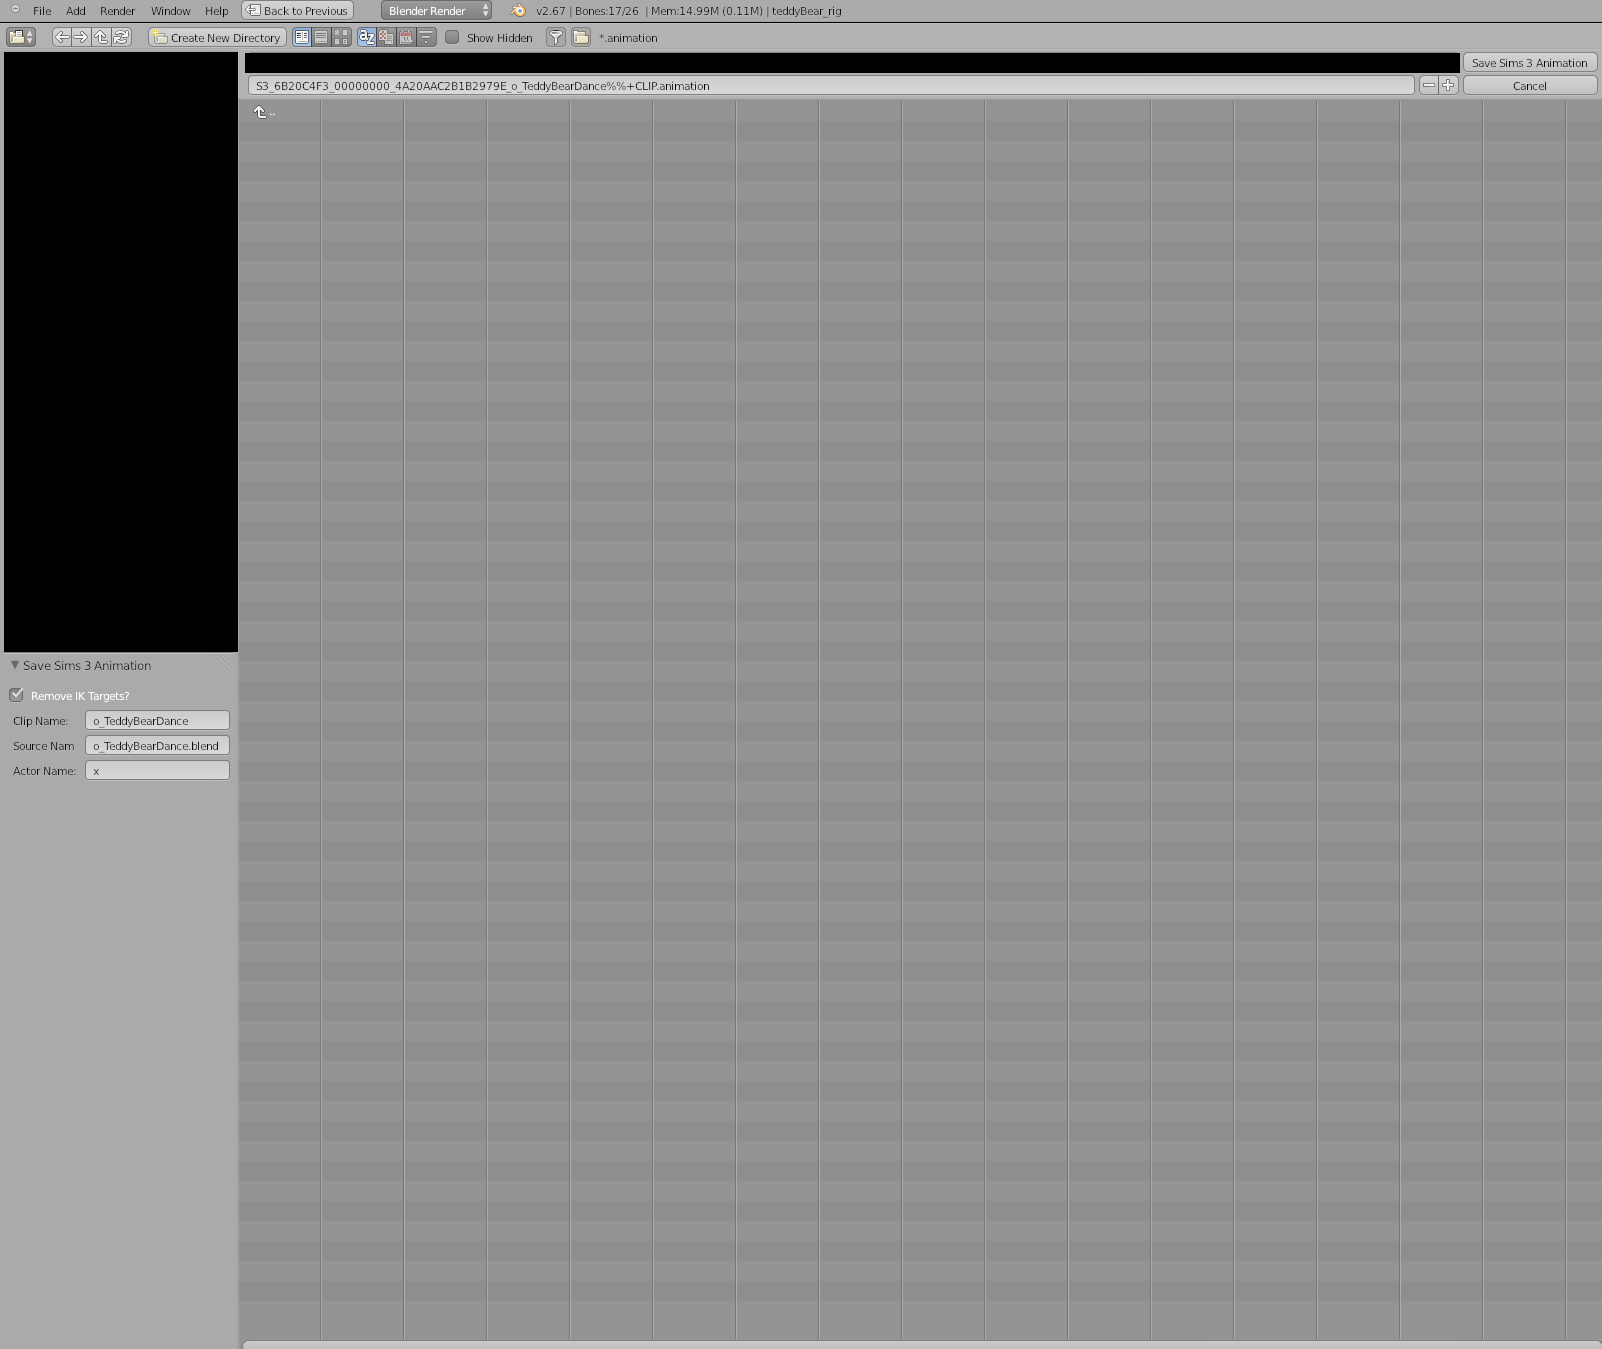
- Time to export! Go to File > Export > Sims 3 Animation
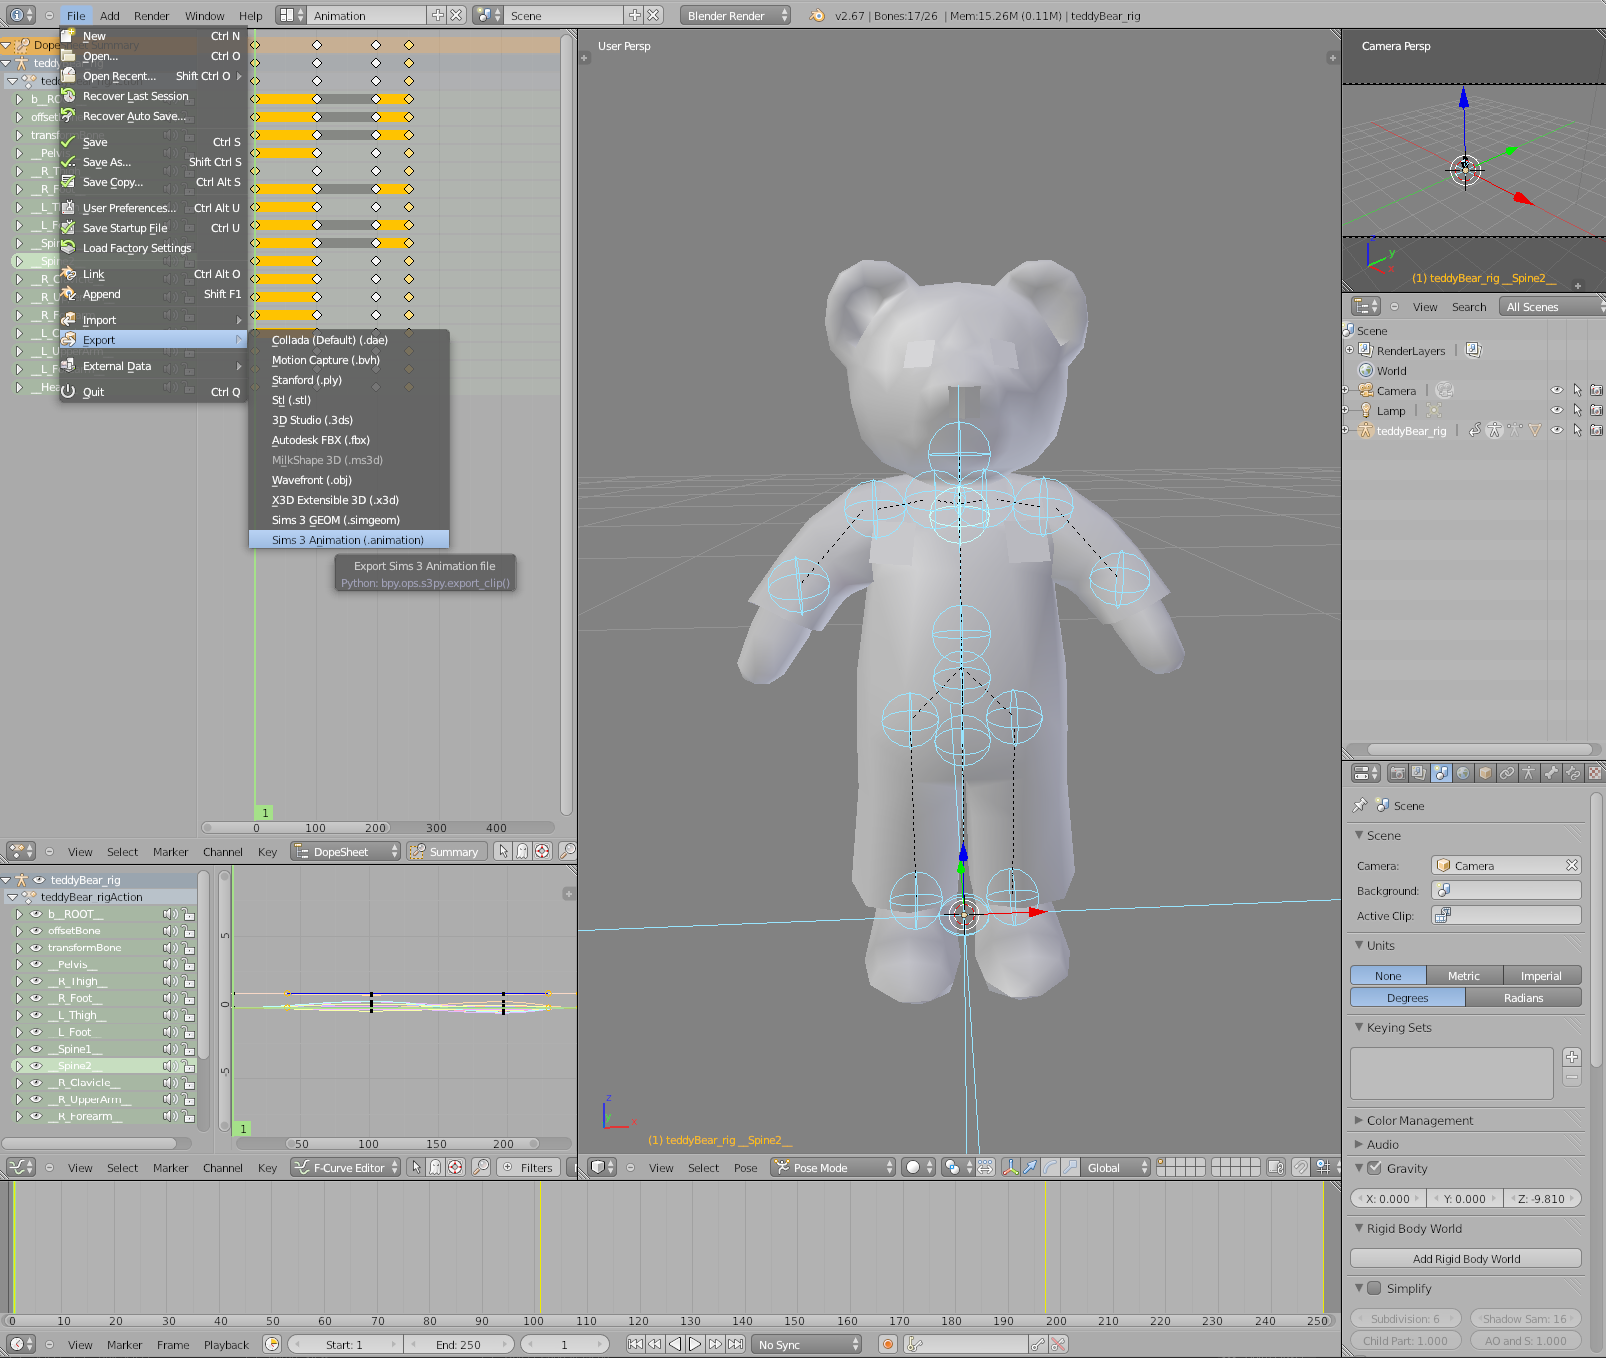
- For object animations ALWAYS start with o_ Else the game won't recognise it!!
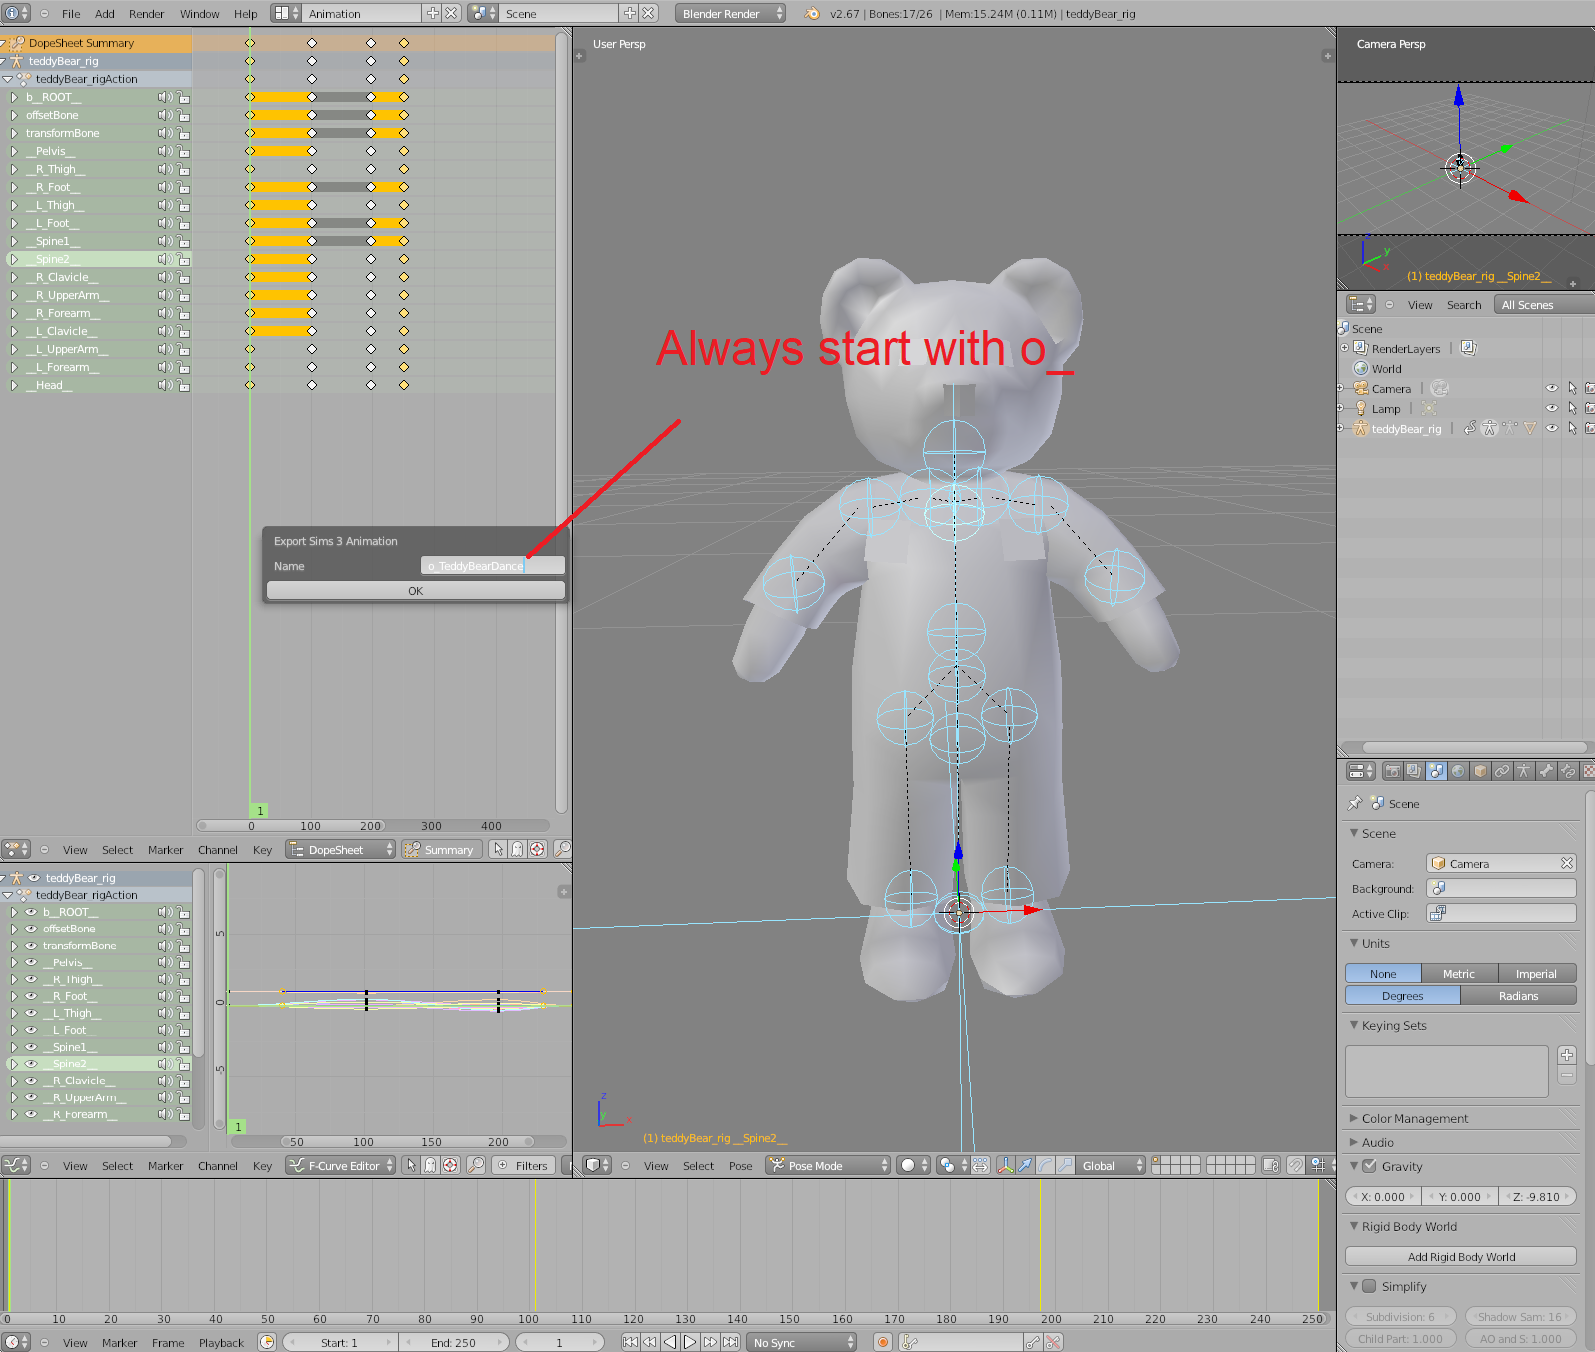
Save your animation and voila!
End result:
NOTE: Unfortunately pose player can't actually run animations on objects, unlike sims. However, if you follow my Jazz script tutorial, it should be relatively easy to set up animations for objects :) hopefully this helped!
"But what about objects that are decoratives, etc?"
They actually have bones! But they have one of the sphere thingies. In that case, use those :) All objects that are decoratives and don't actually have a rig like the teddy bear has one.